
1. Scope and How to Use This Guide
This guide teaches the complete base game first. It then covers Space Agencies and all four official promo cards. Expansion rules are kept out of the base-game procedure.
For a first game, read in order and set out the components as you go. Experienced players may skip directly to the expansion section. Detailed rules for the three new alien species are hidden in a spoiler disclosure.
Eight short “Further Context” boxes focus on how separate rules join into action chains. External knowledge is limited to one useful layer. These boxes add no rulings; official text and card wording always control.
Rules references
- Base game: official Simplified Chinese rulebook and official FAQ.
- Expansion: official Simplified Chinese Space Agencies rulebook and alien-species aid.
- Promo cards: official promo-card rules.
- Individual card cases: continuously updated official card-clarification thread.
2. Objective and Table Overview
The base game lasts 5 rounds. The player with the most points after final scoring wins. Tied players share the victory.
The main sources of points are:
- project cards and endgame cards with gold text boxes;
- technologies;
- sector victories;
- missions and milestones;
- landings, alien discoveries, and further research.
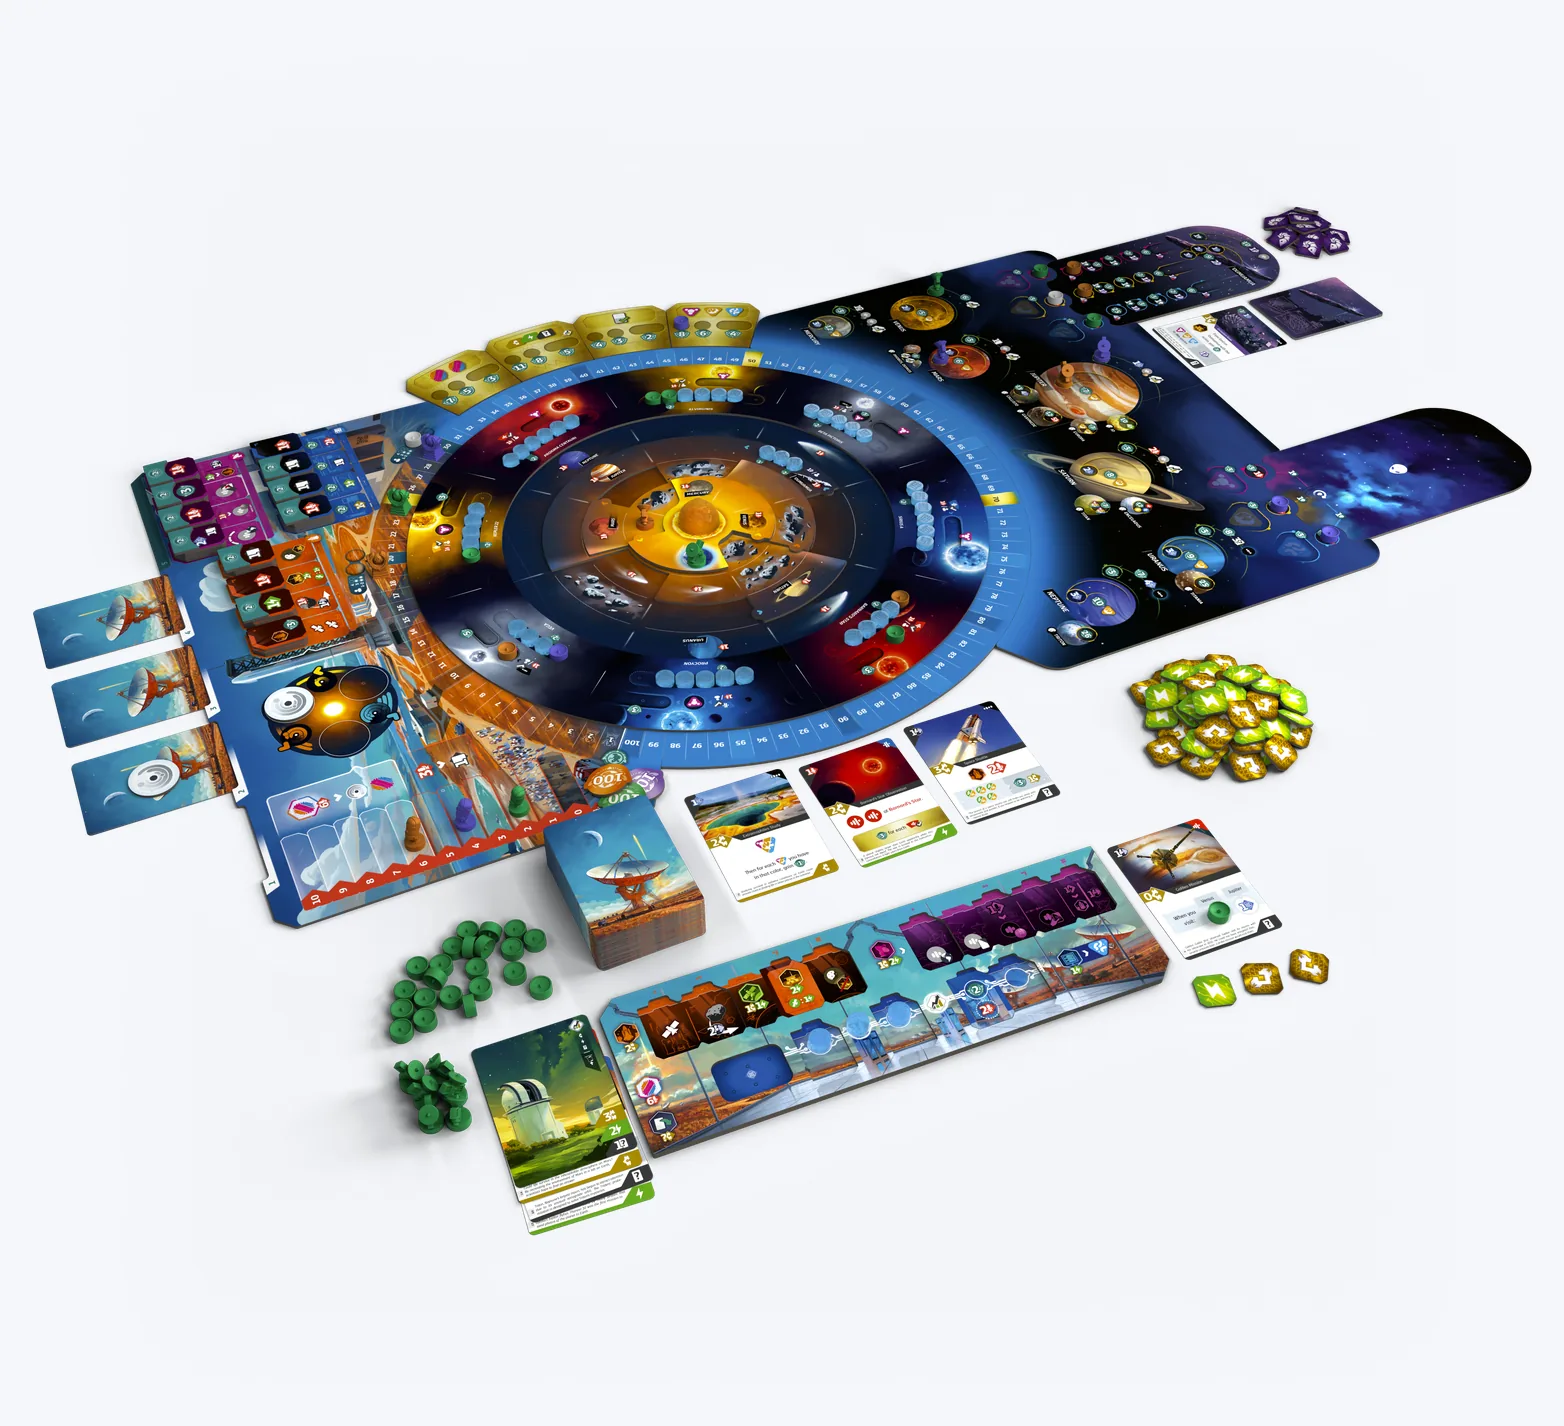
Figure: A complete game at a glance. Official SETI media assets, © Czech Games Edition; this site only resizes and compresses the image and adds a neutral background.
The table has four main areas:
- Central Solar System: probes leave Earth and move among the planets.
- Eight nearby-star sectors: players mark signals, collect data, and compete for majorities.
- Planet, technology, and alien-species boards: these handle landings, upgrades, and alien traces.
- Player areas: these hold credits, energy, cards, probes, data, and technologies.
There are three types of alien trace:
- pink: gained mainly from scanning and winning sectors;
- yellow: gained mainly from landing on planets;
- blue: gained mainly from analyzing data.
A wild trace shows all three colors. Choose pink, yellow, or blue when you gain it.
Further Context — Biosignatures and technosignatures
NASA calls observable evidence left by life biosignatures and evidence left by technology technosignatures. The game groups traces by action source: scanning and sectors connect to pink, landing to yellow, and analysis to blue. This color system links rules; it does not model scientific evidence categories.
3. Three-Player Setup
Shared Area
- Assemble the planet, Solar System, and technology boards.
- Shuffle the 5 alien-species boards. Place 2 at random, face down. Return the other 3 to the box without looking at them.
- Leave all species-specific cards, rule sheets, and components in the box. Take out a set only when that species is revealed.
- Randomly combine the three Solar System discs and 4 sector boards to form 8 clearly bounded sectors. Each sector has one nearby star.
- Fill each star’s printed data slot to its shown capacity. The stars do not all hold the same amount. Keep the remaining data, credits, and energy beside the board as shared supplies.
- Shuffle the main deck and reveal 3 cards to form the card row.
- Randomly choose one side of each of the 4 gold milestone tiles.
- Choose an unused player color for neutral markers. Place 1 neutral marker at both 20 and 30 points.
- For each of the 12 technologies, shuffle its 4 tiles into a face-down stack. Place a “first research +2 points” marker on each stack.
- Prepare one end-of-round stack for rounds 1–4. Each three-player stack contains 4 cards: the player count plus one.
- Put one rotation reminder on the technology board’s rotation track and the other on the round 1 stack.
Player Areas
Each player:
- Chooses a color and takes its player board, starting-income card, 8 probes, 30 markers, score counter, and publicity counter.
- Starts on 1, 2, or 3 points in turn order. The player who most recently saw a UFO takes the starting-player marker.
- Sets publicity to 4, takes 4 credits and 3 energy, and draws 5 cards.
- Tucks 1 hand card under the starting-income card and immediately gains the credit, energy, or card reward in its lower-right corner.
Tucking a credit- or energy-income card leaves 4 cards in hand. Tucking a card-income card immediately draws a replacement, leaving 5 cards.
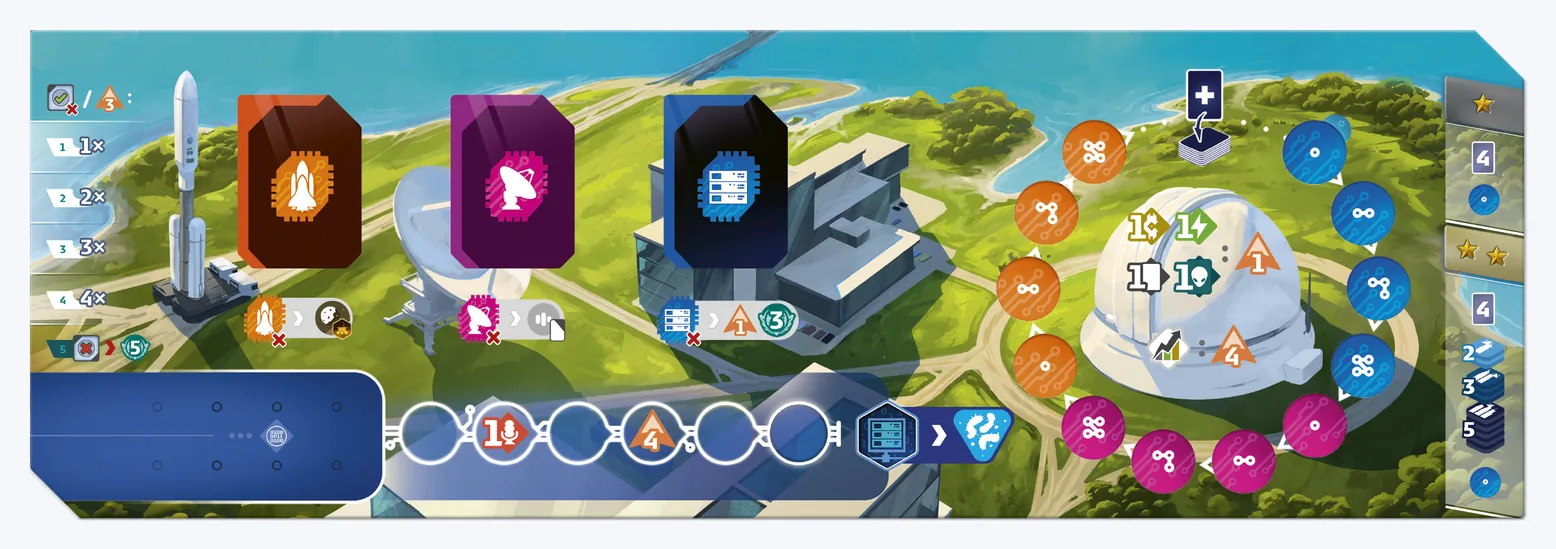
Figure: A player area contains three technology rows, the data pool, the computer, income, and resource tracks. Official SETI media assets, © Czech Games Edition; this site only resizes and compresses the image and adds a neutral background.
Other Player Counts
| Players | Neutral markers at 20 and 30 | Cards in each round stack |
|---|---|---|
| 2 | 2 at each threshold | 3 |
| 3 | 1 at each threshold | 4 |
| 4 | None | 5 |
4. Turn Structure and Free Actions
During a round, players repeatedly take turns in order. A player who has passed takes no more turns that round. The others continue until everyone has passed.
A turn follows this structure:
- Take any desired free actions before the main action.
- Choose and complete 1 main action; free actions may also interrupt it.
- When the main action ends, immediately resolve every sector completed by it. The active player chooses the order if several sectors completed.
- Free actions may still be taken after sector resolution.
- End the turn: resolve milestones first, then alien discoveries.
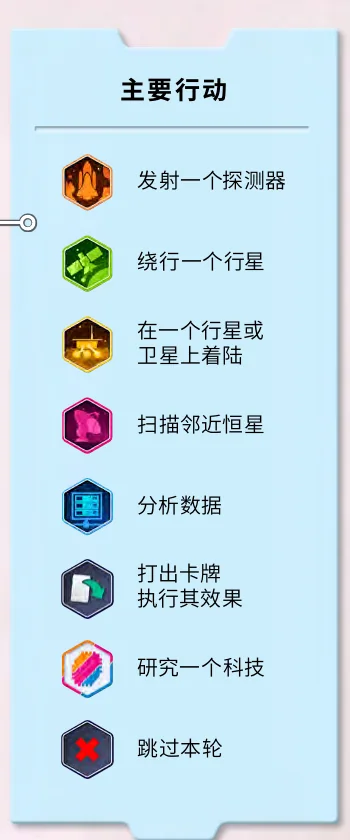
Figure: The seven main actions and Pass. Official Simplified Chinese rulebook, page 7, © Czech Games Edition; this site only makes the necessary local crop.
| Main action | Base cost and requirement |
|---|---|
| Launch a probe | 2 credits; place it on Earth |
| Orbit a planet | 1 credit + 1 energy; a probe has reached that planet |
| Land on a planet or moon | Usually 3 energy; a probe has reached the target |
| Scan nearby stars | 1 credit + 2 energy |
| Analyze data | 1 energy; all 6 upper computer spaces are filled |
| Play a card | Pay the cost in its white effect area |
| Research a technology | 6 publicity; you do not own that technology |
| Pass | No cost; take no more turns this round |
Common free actions:
- spend 1 energy to move one probe 1 space;
- discard 1 hand card to use its upper-left effect;
- move 1 data from the data pool into the computer;
- pay two resources of one kind to gain 1 credit, 1 energy, or 1 card;
- spend 3 publicity to buy 1 card from the card row or the top of the deck;
- complete a card mission whose condition is currently satisfied;
- use a free action printed on a component.
A resource exchange can use 2 cards, 2 credits, or 2 energy. Types cannot be mixed. Each data placement and each space of probe movement is a separate free action.
Free actions can be used only on your own turn. A free action may interrupt a main action, but one free action cannot interrupt another. Triggered missions are among the few effects that can respond during another player’s turn.
Effects are mandatory unless stated otherwise. Only movement and income increases may be declined. Rotations, signals, technologies, resources, points, alien traces, card-granted main actions, and milestones cannot be skipped. If one part of an effect is impossible, skip only that part.
5. Probe Actions
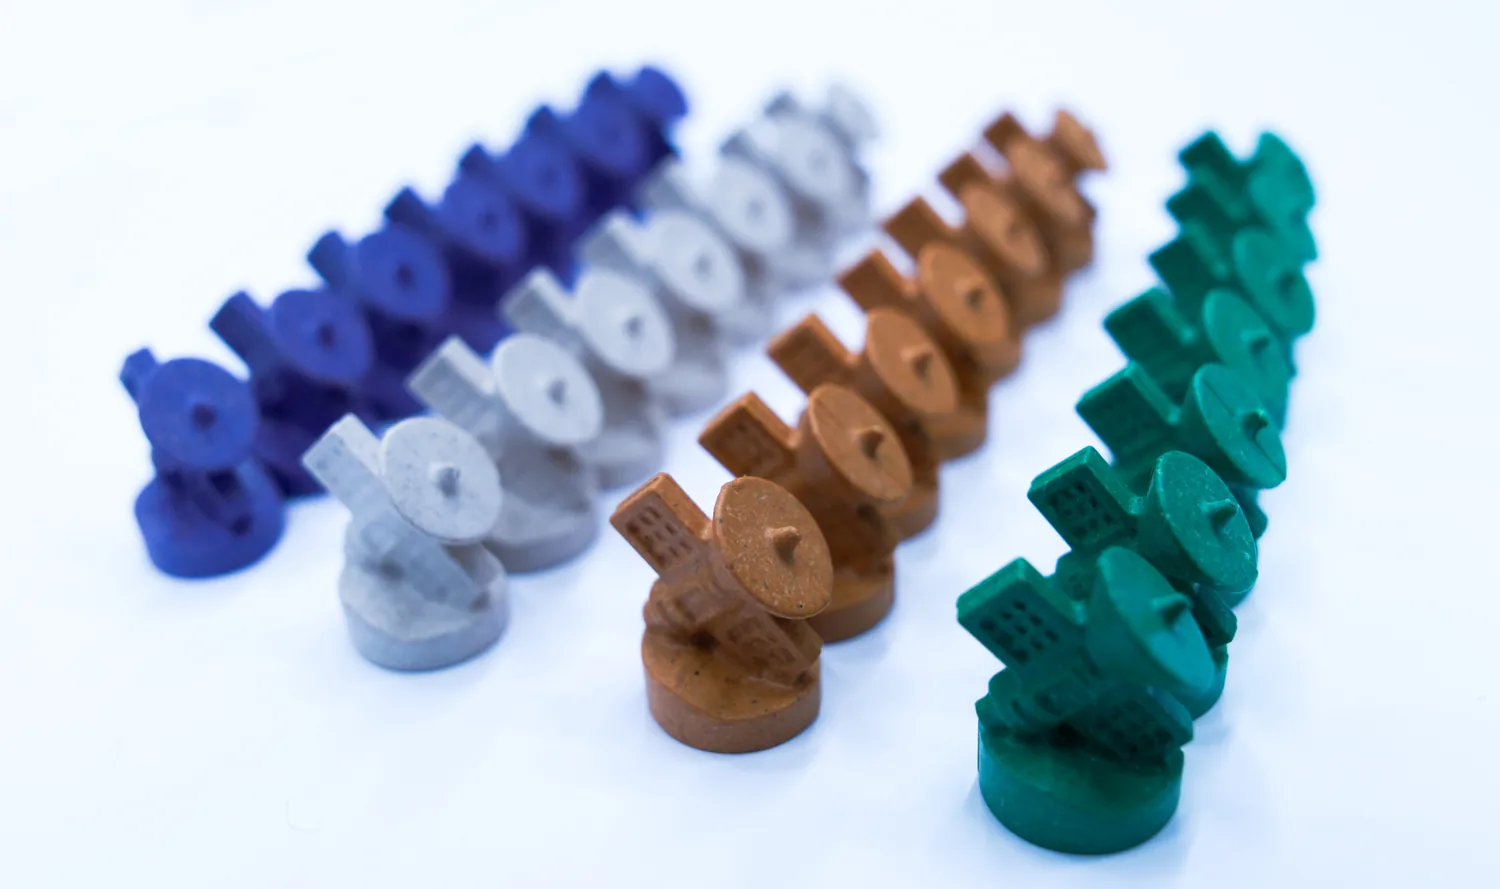
Figure: The same miniature can be a probe, orbiter, or lander; its location defines its role. Official SETI media assets, © Czech Games Edition; this site only resizes and compresses the image.
Launch and Move
Launch costs 2 credits. Place 1 probe from your supply on Earth. By default, you may have only 1 probe in space.
The new probe may move during the same turn. Spend 1 energy for each orthogonally adjacent space:
- movement is never diagonal;
- the Sun cannot be entered or crossed;
- leaving an asteroid costs 1 extra movement; entering it does not;
- entering a celestial body with a publicity icon gains 1 publicity; Earth is excluded;
- visiting the same body again can gain its publicity again.
A probe may remain in space and move, orbit, or land on a later turn.
Orbit
After a probe reaches a planet other than Earth, a later turn may use the Orbit action:
- Pay 1 credit and 1 energy.
- Move the miniature from the Solar System to that planet’s orbit.
- Gain the orbit reward. The first player to orbit that planet also scores 3 points.
An orbiter no longer moves and cannot later become a lander. It does not count against the limit of probes in space.
Land
After a probe reaches its target, a later turn may use the Land action:
- Pay 3 energy in most cases.
- If any player already has an orbiter at that planet, the cost is 2 energy.
- Move the miniature to the landing area and gain its points, printed reward, and yellow trace.
- The first lander usually gains data as well.
Mars has two data spaces, so its first two landers each gain data.
Landing on a moon requires the matching probe technology or explicit permission from an effect. Gain only the reward printed on the moon space. A yellow trace is gained only if that space shows one. Each moon space holds 1 lander.
A lander no longer moves and does not count against the limit of probes in space.
Further Context — The probe mission chain
A complete chain is usually launch → free movement → orbit or land on a later turn. A launch may come from a main action or card; movement may come from energy or cards; technologies and existing orbiters can change routes and costs. When reading a card effect, identify which step it replaces, then supply the remaining position and cost requirements.
6. Scanning and Sector Resolution
Scan
Scan costs 1 credit and 2 energy. A basic scan must mark two signals; complete the following two steps in either order:
- Mark 1 signal in the sector currently aligned with Earth.
- Discard 1 card from the card row. Choose one of the two sector colors in its upper-right corner and mark 1 signal in a matching sector.
Refill the card row only after the entire scan and all technology effects are complete. Telescope technologies may move or add signals. A scan can mark up to 4 signals, and any extra technology costs must still be paid.
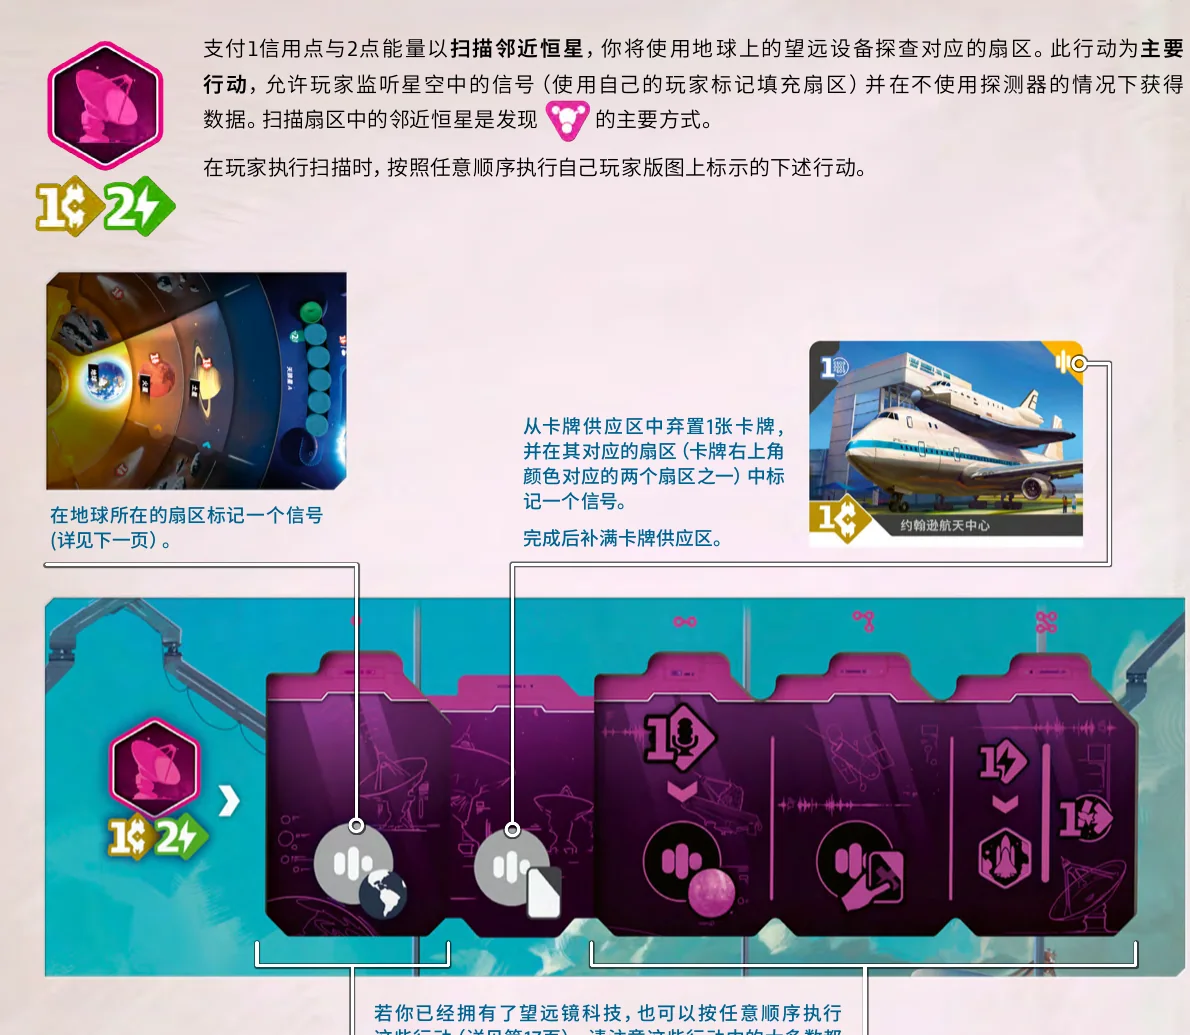
Figure: The two signals of a basic scan and the telescope technologies. Official Simplified Chinese rulebook, page 12, © Czech Games Edition; this site only makes the necessary local crop.
Mark a Signal
Each time you mark a signal:
- Take the leftmost data token from that sector and put it in your data pool.
- Replace the token with one of your player markers.
- If you fill the second space, immediately score 2 points.
Marking a signal is mandatory. If every data space already contains a marker, place an excess signal beside that slot. It gains no data but counts in the upcoming majority comparison.
Resolve a Sector
Replacing the final data token completes the sector. Resolve it when the current main action ends:
- The player with the most markers wins. Ties go to the marker placed later.
- The winner places a record marker beside the nearby star and gains its reward.
- Every player who contributed at least 1 signal gains 1 publicity, including the winner.
- Determine second place using the same count and tiebreaker. If there is one, that player leaves 1 marker in the first space after reset.
- Return all other markers and refill the empty spaces with data.
Excess signals count for the majority and participation; each player still gains only 1 publicity per resolution. Earlier victory markers beside the star do not count in the next contest. A sector can be completed and won repeatedly.
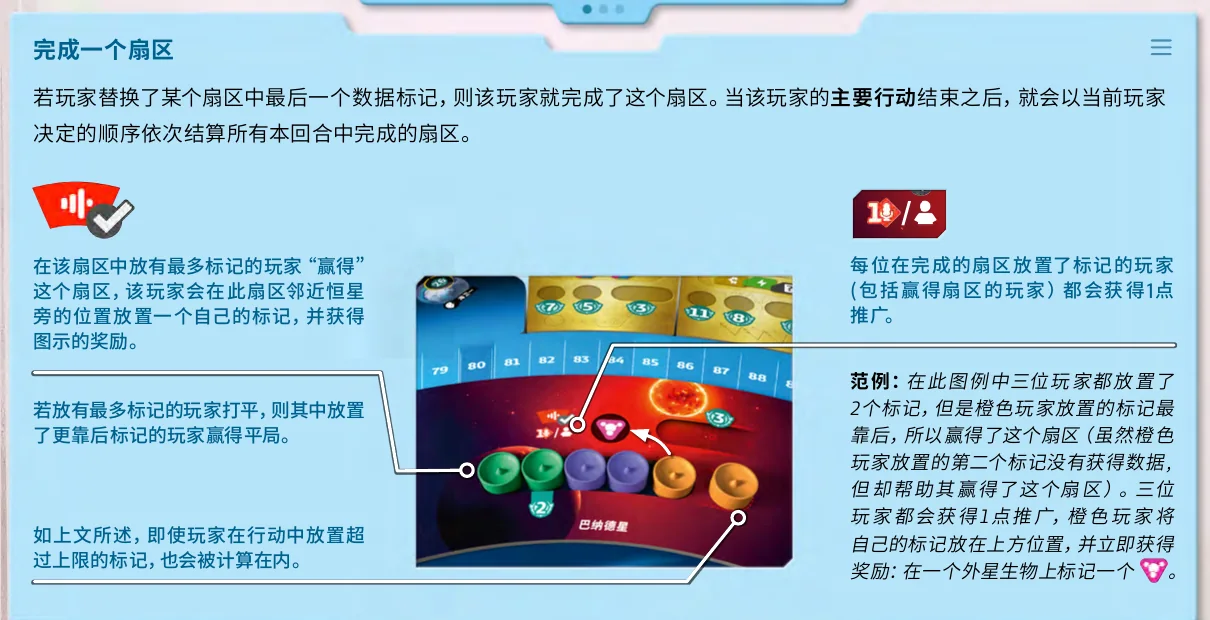
Figure: Sector majority, rewards, the second-place marker, and reset. Official Simplified Chinese rulebook, page 13, © Czech Games Edition; this site only makes the necessary local crop.
Sector resolution occurs when the main action ends. To place data, buy a card, or complete a mission before resolution, insert those free actions during the main action.
7. Data and Analysis
New data enters the data pool. Its capacity is 6; excess data must be discarded.
On your turn, a free action moves 1 data from the pool into the computer:
- the 6 upper spaces of the base computer fill from left to right;
- gain any publicity, income increase, or points shown on a covered space immediately;
- computer technologies add one upper and one lower space;
- a lower space can be filled only after its upper space is occupied;
- lower spaces do not have to be filled from left to right.
When all 6 base upper spaces are filled, Analyze Data costs 1 energy:
- Clear all data from the upper and lower computer spaces.
- Keep all data still in the data pool.
- Mark 1 blue alien trace.
Technology spaces below the base row may remain empty.
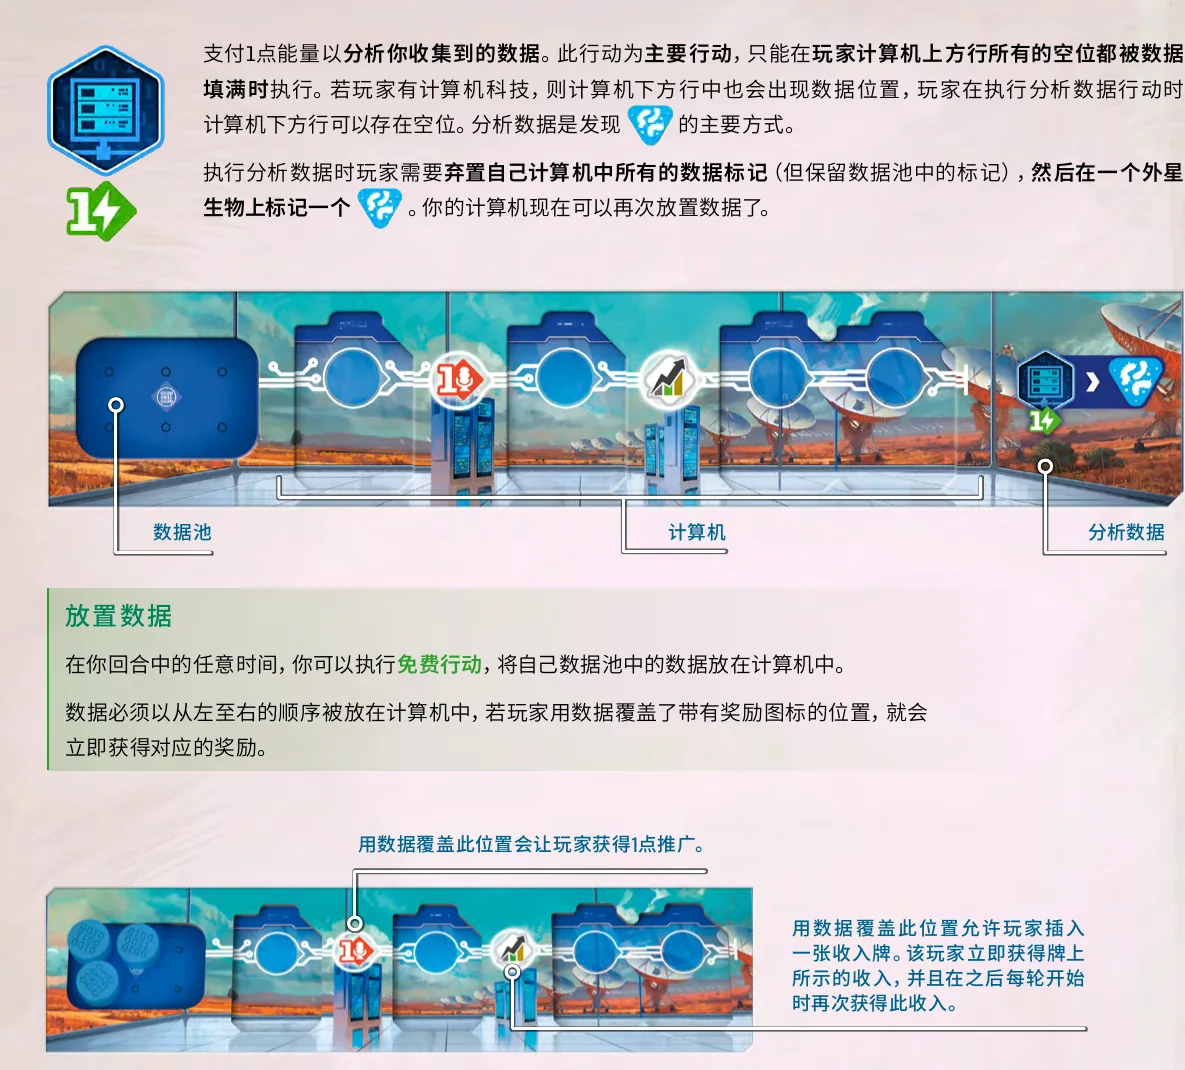
Figure: Data moves from the pool to the computer; analysis requires a full upper row. Official Simplified Chinese rulebook, page 14, © Czech Games Edition; this site only makes the necessary local crop.
Further Context — From candidate signal to evidence chain
Real SETI rejects interference and repeats candidate observations; Project Phoenix also used a second telescope for confirmation. The game’s main chain is scan → signal → data pool → computer → analysis → blue trace. If a scan fills a sector, finish the scan and any free actions inserted into it, then resolve the sector when the main action ends; when the pool nears 6, first check whether you can load or analyze data.
8. Four Uses for a Card
A hand card can be used in one of four ways:
- Play it: use a main action, pay the cost in the white area, and resolve the effect.
- Discard it: use a free action and resolve the upper-left effect.
- Increase income: when allowed by an effect, tuck it under the starting-income card. Gain its lower-right reward immediately and again during later income phases.
- Exchange resources: pay it together with another hand card to gain 1 credit, 1 energy, or 1 card.
Further Context — Opportunity cost
Opportunity cost is the value of the best alternative lost after choosing one use. A hand card normally enters one of four chains: its main effect, discard free action, income, or a two-card resource exchange. Compare the missions completed and the final return of each chain. Conclusion: keep a card for an immediate mission or an action unavailable elsewhere; use the remainder for income or the resource currently missing. If the main effect grants another action, that action skips its base cost but retains position requirements, technology surcharges, and subsequent mission, sector, and trace resolution.
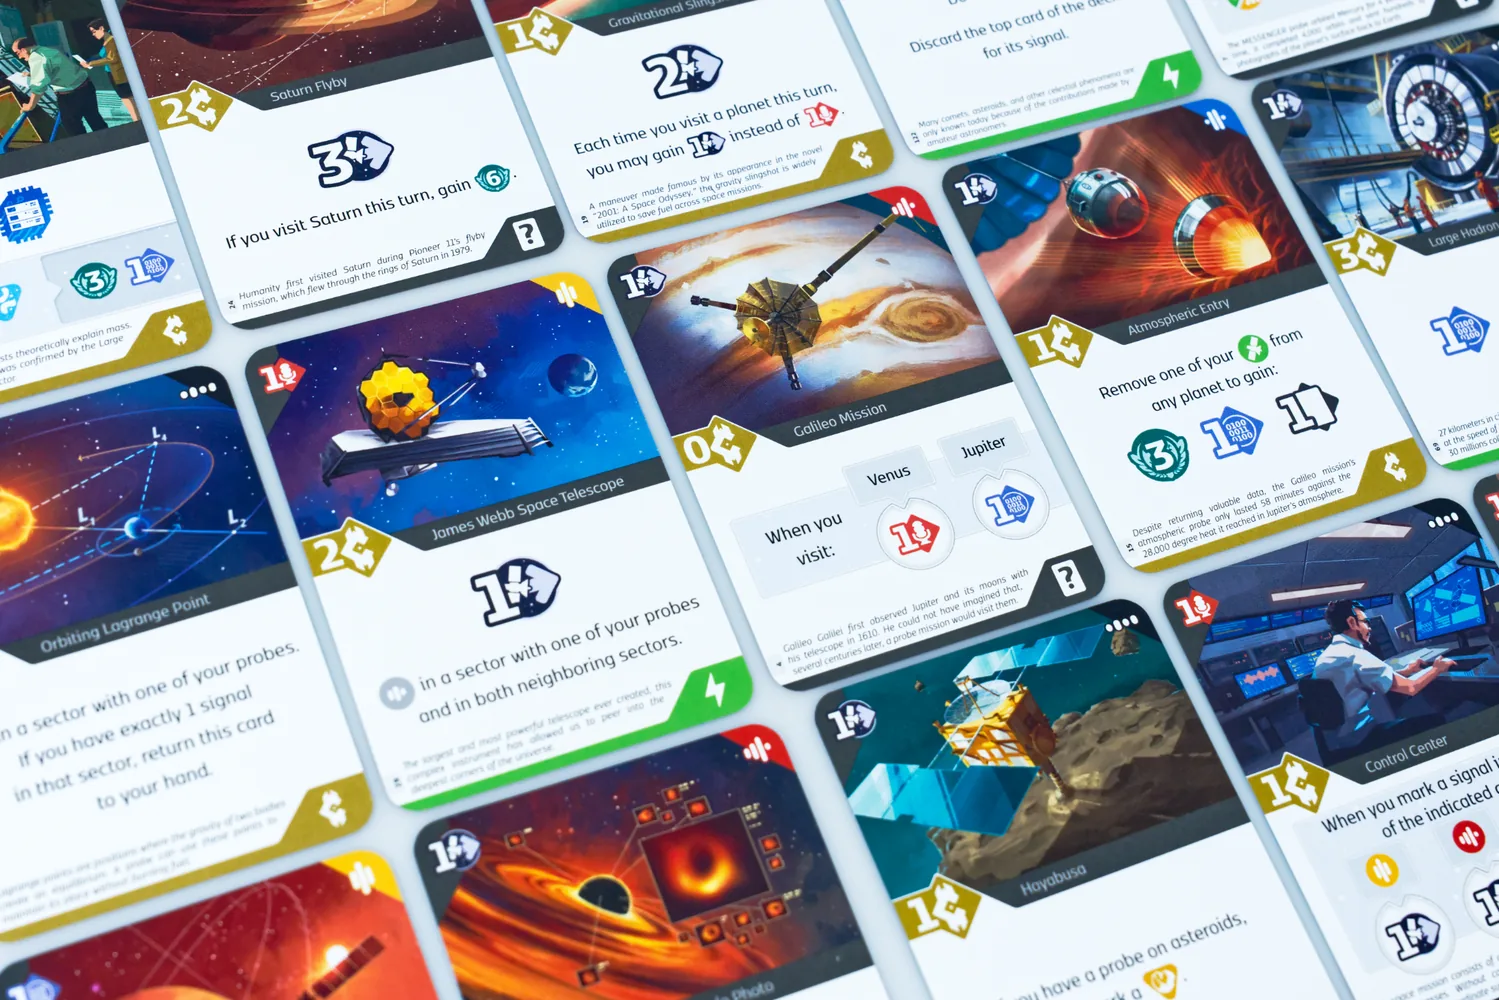
Figure: Physical project cards. Official SETI media assets, © Czech Games Edition; this site only resizes and compresses the image.
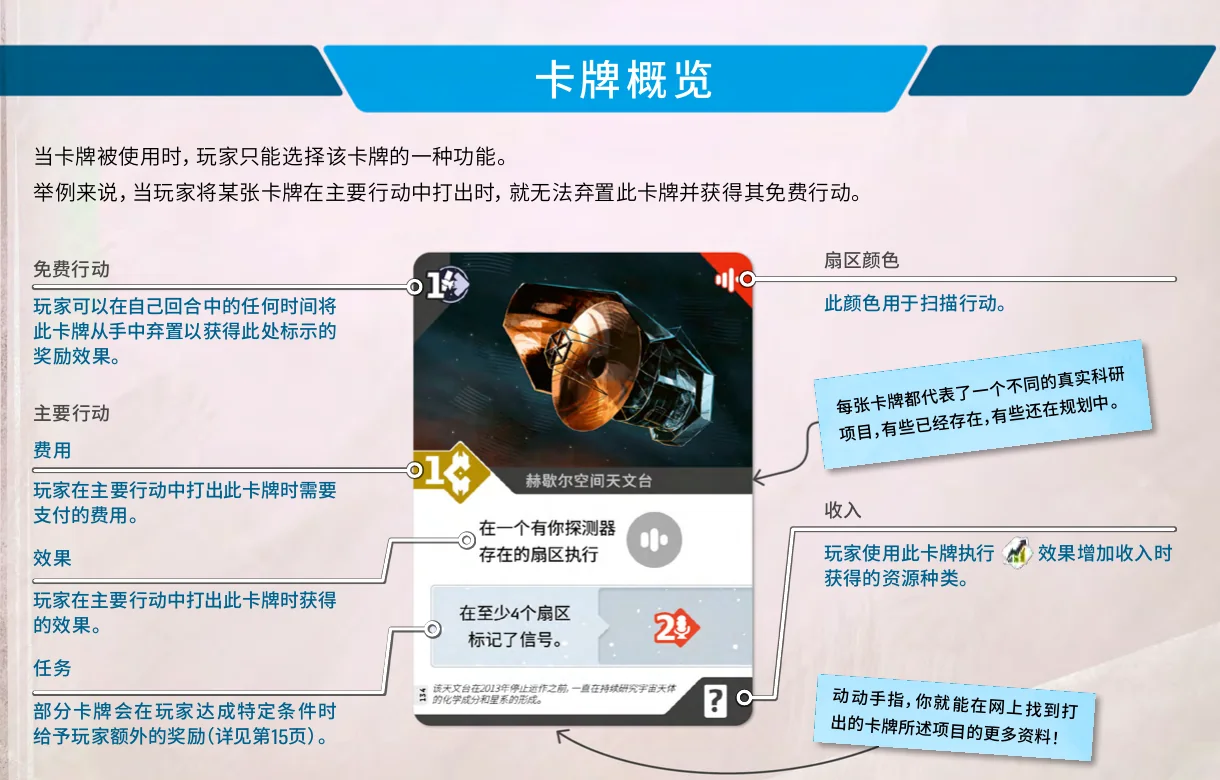
Figure: The upper-left free action, lower-left cost, white effect, upper-right sector colors, and lower-right income. Official Simplified Chinese rulebook, page 7, © Czech Games Edition; this site only makes the necessary local crop.
If a card directly grants a launch, scan, orbit, landing, analysis, or research action, do not pay that action’s base cost. All position and legality requirements still apply. Extra costs on technologies must still be paid when those technologies are used.
There are two mission types:
- Conditional mission: complete it as a free action on any of your turns while its condition is still true.
- Triggered mission: it records only events that happen after the card is played. You may decline one trigger, but a qualifying event must happen again before you can mark it.
One event can mark only 1 reward circle on the same mission. Cards with gold text boxes are endgame cards; keep them after playing them and score them at the end of the game.
When a card leaves the card row, refill it to 3 immediately. Scanning is the exception: refill only after the scan. If the main deck runs out, shuffle the discard pile into a new deck.
9. Technology and Solar System Rotation
Publicity has a maximum of 10. With at least 6 publicity, research one technology you do not own:
- Spend 6 publicity.
- Rotate the Solar System first.
- Take the top tile from the matching technology stack.
- If this is the first tile taken from that stack, remove its “first research +2 points” marker and score 2 points.
- Gain the one-time reward on the tile’s face, then flip and install it on your player board.
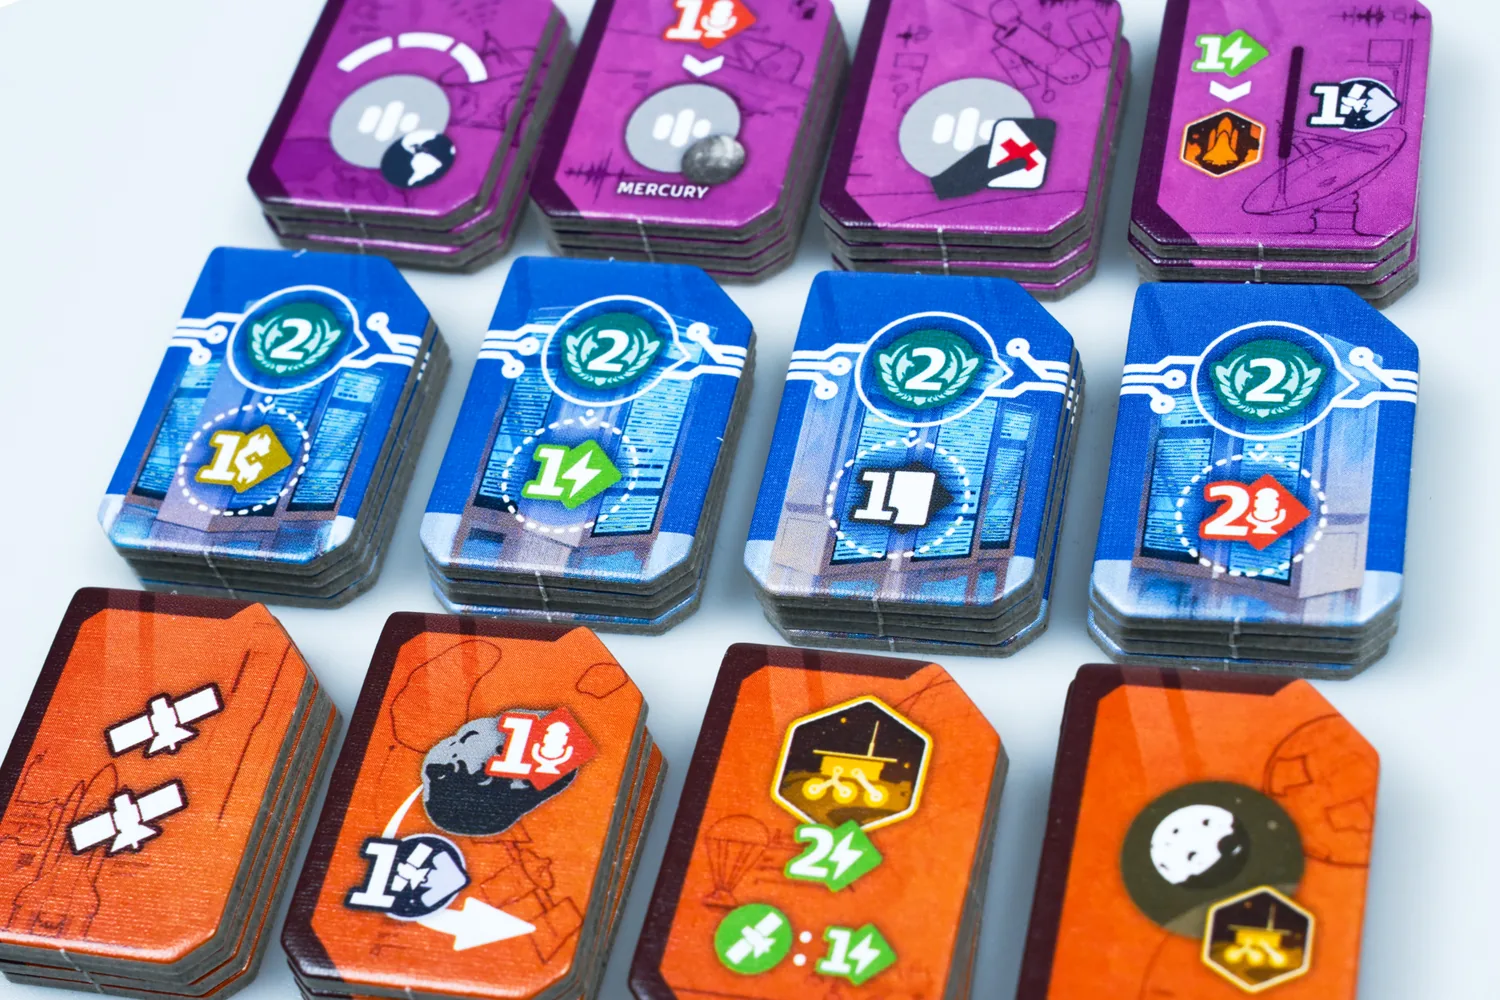
Figure: Probe, telescope, and computer technologies. Official SETI media assets, © Czech Games Edition; this site only resizes and compresses the image.
- Probe technologies: raise the in-space probe limit, improve asteroid movement, reduce landing costs, or unlock moons.
- Telescope technologies: operate only during scans and move or add signals.
- Computer technologies: add data spaces; the upper space usually scores 2 points and the lower space gives another reward.
Solar System rotation follows a fixed cycle:
- The first rotation turns only the top disc.
- The second turns the middle disc and carries the top disc.
- The third turns the bottom disc and carries both discs above it.
- The fourth returns to the top disc.
Every affected disc turns one sector counterclockwise.
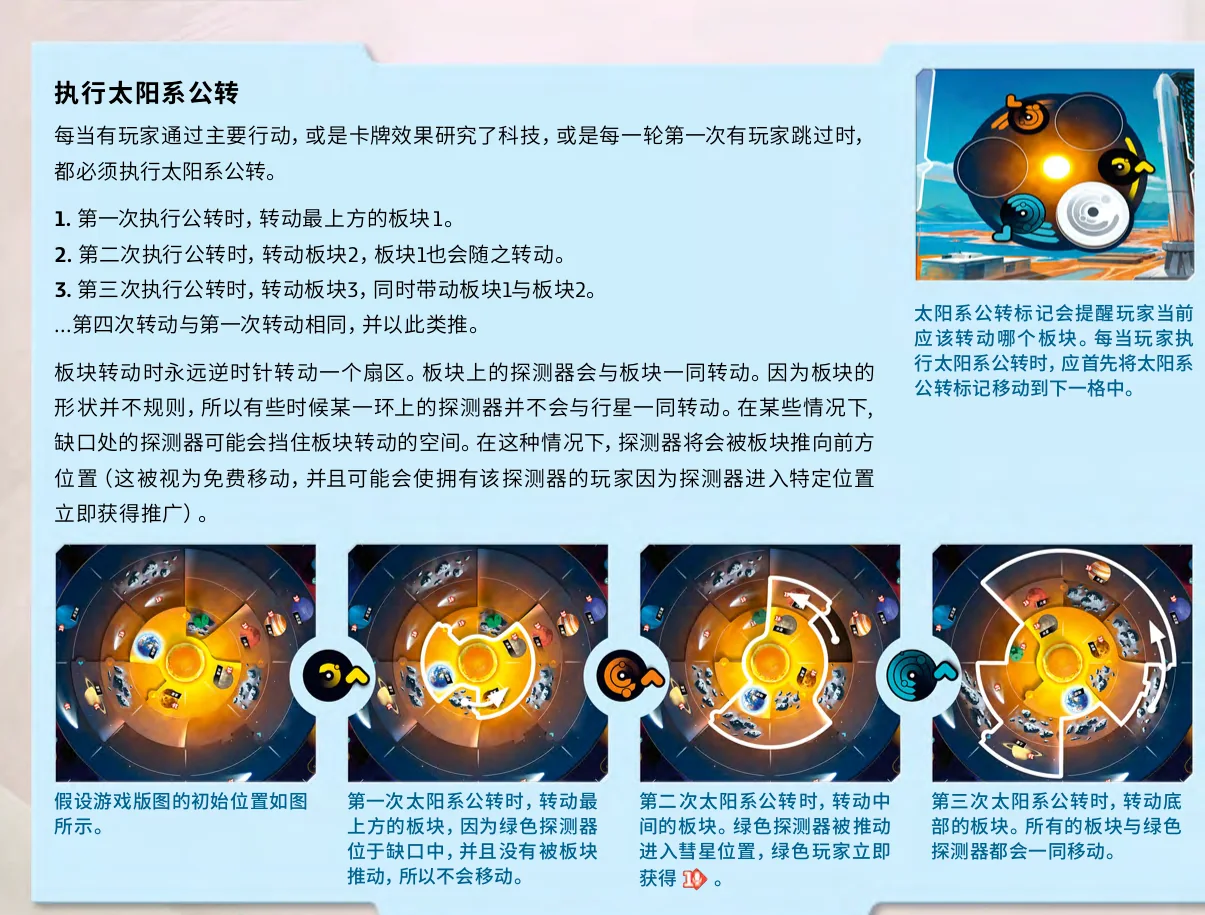
Figure: The 1→2→3 Solar System rotation cycle. Official Simplified Chinese rulebook, page 16, © Czech Games Edition; this site only makes the necessary local crop.
Further Context — Orbital mechanics and a discrete model
Kepler’s third law says that more distant orbits generally take longer; the game retains only changing relative positions through its 1→2→3 disc cycle. The research chain is spend publicity → rotate → resolve moved or pushed probes → take the technology → gain its reward, so the new technology cannot affect that rotation. The first player to pass triggers the same rotation and changes routes and Earth’s aligned sector for players still active.
Rotation is triggered when:
- a player gains a technology through a main action or card;
- the first player passes in each round.
The first player to pass in round 5 still rotates the system. A rotation icon printed beside a technology icon on a card is a reminder, not a second rotation.
Open spaces between the incomplete discs are gaps. Resolve each probe from its current position:
- A probe on a rotating disc moves one sector with that disc.
- A probe in a gap remains where it is if the disc does not touch it.
- If a rotating disc reaches a probe in a gap, push that probe into the next space.
A probe pushed onto a celestial body with a publicity icon gains that publicity, even during another player’s turn.
10. Passing and the End of a Round
Pass is a main action. You may take free actions first, then resolve:
- If you have more than 4 cards, discard down to 4. There is no hand limit at other times.
- If you are the first player to pass this round, rotate the Solar System.
- In rounds 1–4, choose 1 remaining card from the round’s end-of-round stack and add it to your hand.
In a three-player game, the first player chooses from 4 cards, the second from 3, and the last from 2. The final unchosen card is discarded.
After passing, you take no more turns or free actions that round.
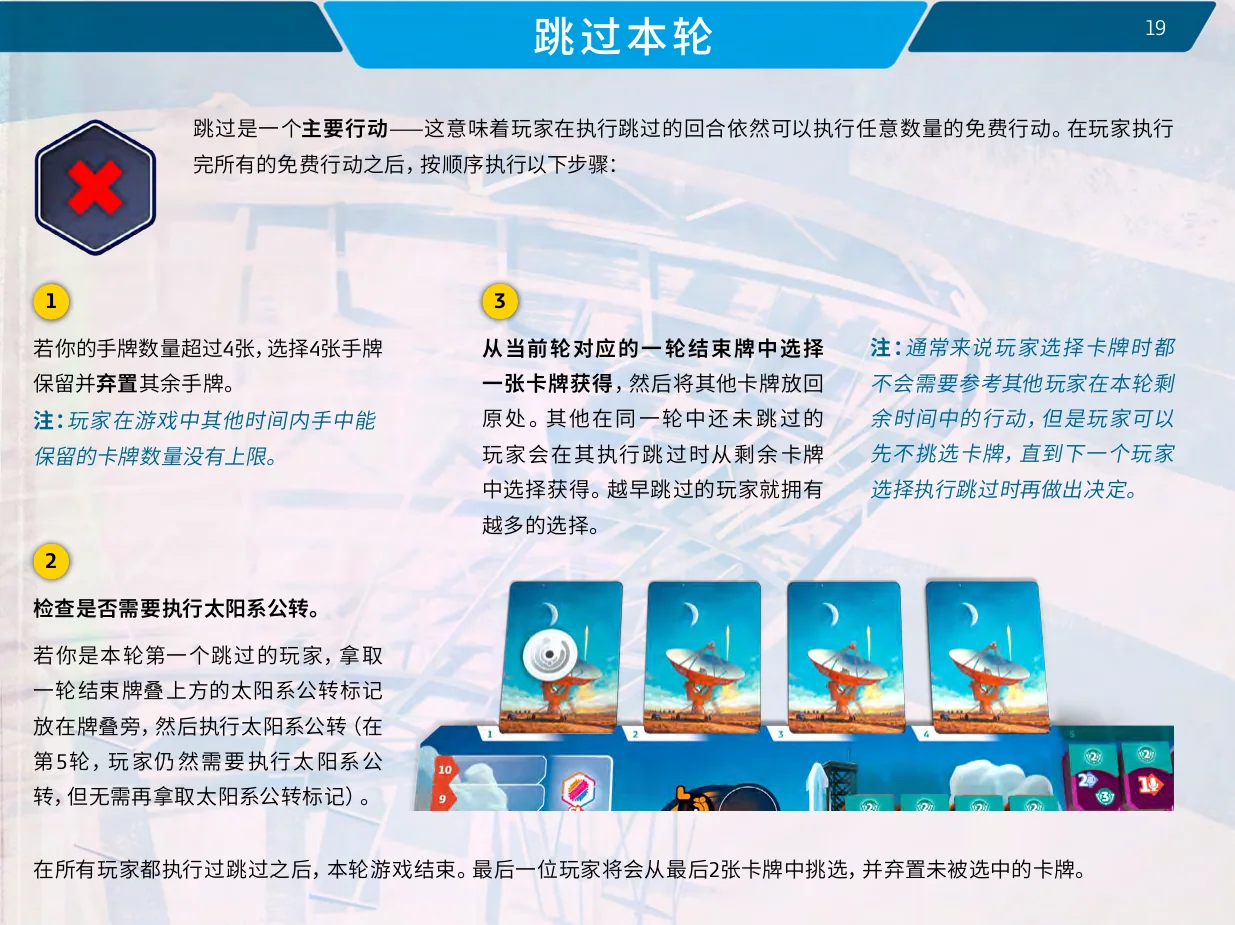
Figure: Discard to 4, rotate for the first pass, and choose an end-of-round card. Official Simplified Chinese rulebook, page 19, © Czech Games Edition; this site only makes the necessary local crop.
After everyone passes in rounds 1–4:
- Each player gains 3 credits, 2 energy, and 1 card from the starting-income card.
- Each player gains all tucked income.
- Pass the starting-player marker clockwise.
- Move the rotation reminder to the next round stack.
Credits, energy, and cards carry over between rounds. Round 5 has no end-of-round cards. When the final player passes, proceed directly to final scoring and do not collect income.
Further Context — Pass links two rounds
The chain is finish final free actions → discard to 4 → first passer rotates → in rounds 1–4 choose an end-of-round card → wait for everyone to pass → collect income; after round 5, proceed directly to final scoring. The first passer changes the Solar System before the others finish the round. Passing ends access to free actions, so resolve any eligible card missions, data loading, and resource exchanges first.
11. Alien Traces, Milestones, and Discovery
Here, “milestones” means the gold milestone tiles beside the board. Card missions are resolved separately.
Place an Alien Trace
When you gain an alien trace, you must place a marker in a matching-color location. Before a species is revealed, choose:
- Discovery space: place the marker in an empty matching space beneath either species; gain 1 publicity and 5 points.
- Overflow area: place it in a matching area for either species; score 3 points.
Each species has one pink, yellow, and blue overflow area. These areas never fill; markers of the same color may accumulate. You may choose overflow even while a discovery space remains empty.
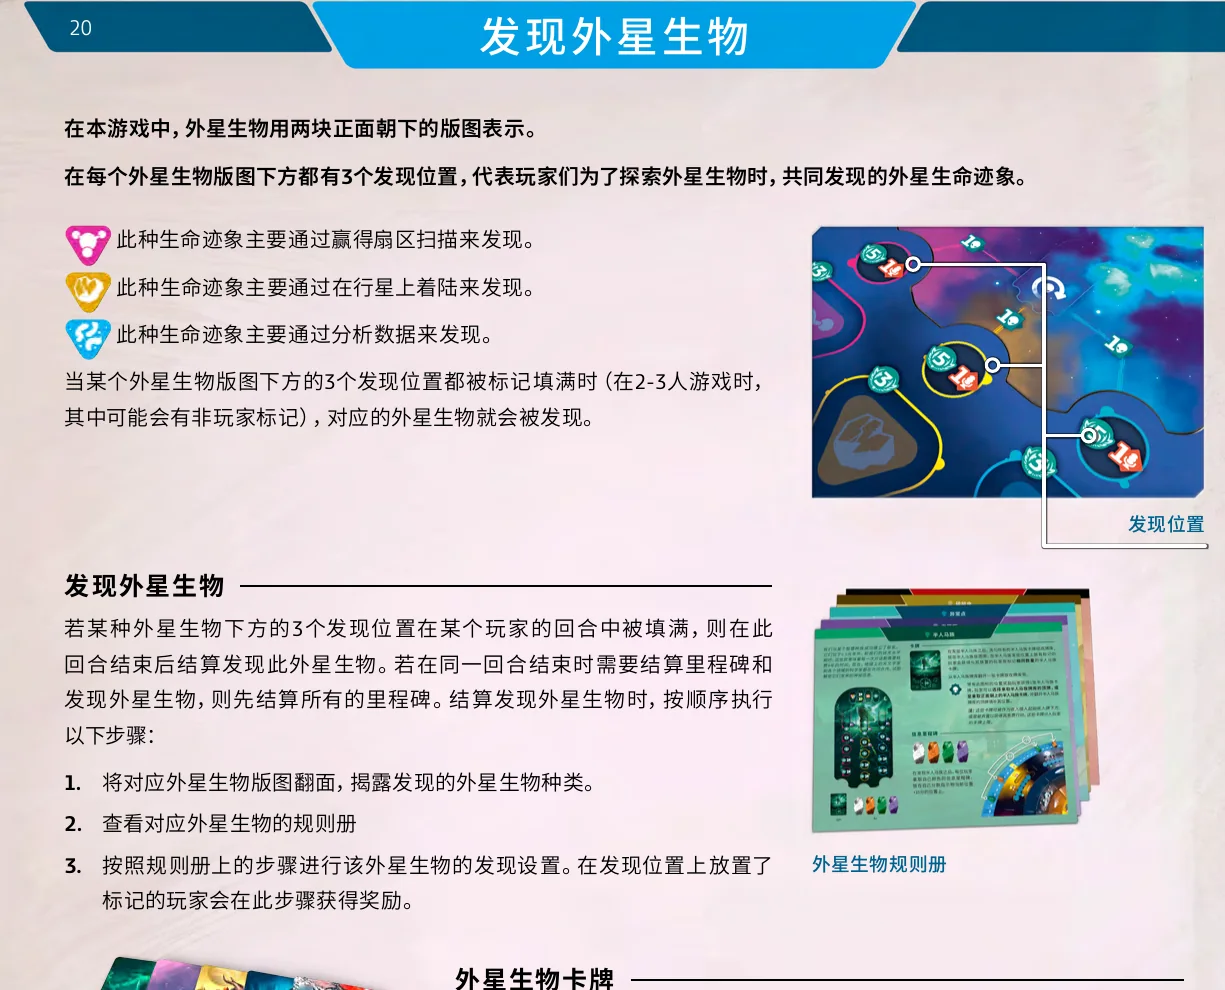
Figure: The three trace types, discovery spaces, and alien reveal procedure. Official Simplified Chinese rulebook, page 20, © Czech Games Edition; this site only makes the necessary local crop.
End-of-Turn Milestones
The first time you reach or pass 25, 50, or 70 points, choose a gold milestone you have not selected before. Place your marker on its highest open scoring position. If one turn crosses several thresholds, resolve each one. The milestone scores only at the end of the game.
In a three-player game, a neutral marker waits at both 20 and 30 points. The first player to reach or pass a threshold moves that marker to the leftmost empty discovery space among all six: fill the three spaces under the left species first, then the right. Neutral markers never enter overflow or a revealed species board, but they can complete a discovery.
If several players reach milestones during one turn, resolve them clockwise from the active player. Place all neutral markers before checking for alien discovery.
Reveal an Alien Species
When all three discovery spaces beneath one species are filled, reveal it after the current turn:
- Resolve every milestone first.
- Flip the species board.
- Take out that species’ rules sheet, cards, and components.
- Follow its setup instructions.
- Each player occupying a discovery space gains the reward printed for discovery on that space. Do not repeat the 5 points and 1 publicity already gained when the marker was placed.
Markers in overflow do not receive the discovery-contribution reward.
After a species is revealed, a new alien trace may be placed in:
- an empty matching space on a revealed species board;
- an empty matching discovery space beneath a hidden species;
- a matching overflow area for either species.
Spaces on a revealed species board do not fill from bottom to top. Gain the reward printed on the space you choose.
Further Context — Alien discovery joins several action chains
Scanning and sectors, landing, and analysis produce pink, yellow, and blue markers; each can be placed in the shared discovery structure. A neutral milestone marker can also fill a space when a score threshold is crossed, so an action that only scores points may still cause a discovery at turn end. Before ending a turn, check score thresholds, discovery spaces, and their resolution order together.
12. A Complete Three-Player First Round
This example uses only guaranteed starting resources. It does not rely on random planet or sector rewards.
Assumptions:
- A, B, and C act in that order and start on 1, 2, and 3 points.
- Venus is orthogonally adjacent to Earth, with no asteroid exit between them.
- A and C tuck credit-income cards. B tucks an energy-income card.
- After setup, A and C each have 5 credits and 3 energy. B has 4 credits and 4 energy. Everyone has 4 cards and 4 publicity.
- No scan in this example completes a sector.
Action Log
- A launches and moves. A pays 2 credits and places a probe on Earth, then uses a free action to spend 1 energy and move to Venus. Visiting Venus gains 1 publicity. A has 3 credits and 2 energy left.
- B scans. B pays 1 credit and 2 energy, marks Earth’s sector, then discards a row card and marks the second sector. The row refills after the scan. Assume both signals gain data. B uses two free actions to fill computer spaces 1 and 2 and gains the publicity on space 2. B has 3 credits and 2 energy left.
- C launches and moves. C follows the same procedure as A and has 3 credits and 2 energy left.
- A orbits Venus. A pays 1 credit and 1 energy, moves the probe to Venus’s orbit, gains the orbit reward, and scores 3 points for being first.
- B passes. B discards down to 4 cards if necessary, rotates the Solar System as the first player to pass, and chooses 1 of the 4 end-of-round cards.
- C lands on Venus. A’s orbiter reduces the cost to 2 energy. C gains the landing reward, first-landing data, and a yellow trace.
- A passes. A chooses 1 of the 3 remaining end-of-round cards.
- C passes. C chooses 1 of the final 2 cards and discards the other.
Round End
Everyone has passed, so round 1 ends:
- each player gains 3 credits, 2 energy, and 1 card from starting income;
- A and C each gain 1 additional credit; B gains 1 additional energy;
- the starting-player marker passes to B;
- the rotation reminder moves to the round 2 stack.
If a scan completes a sector, resolve that sector as soon as the Scan main action ends, before any later free actions.
13. Final Scoring
After the final player passes in round 5, score:
- points already earned;
- endgame cards with gold text boxes;
- gold milestones;
- additional scoring from revealed alien species.
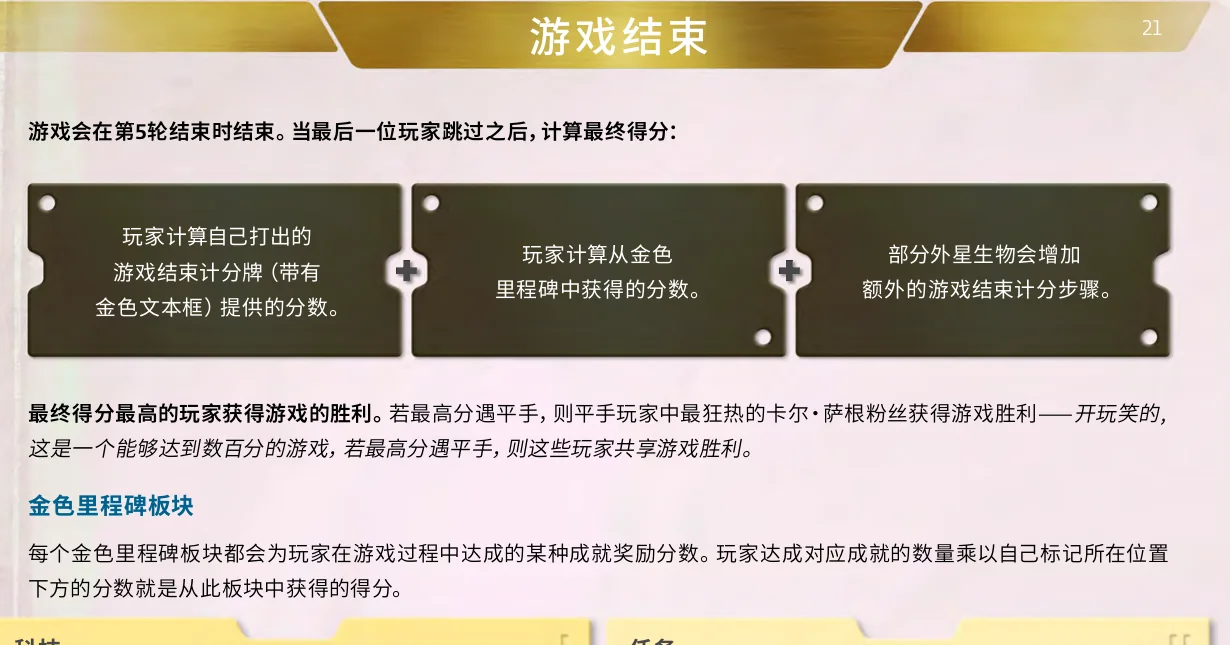
Figure: Final scoring after round 5. Official Simplified Chinese rulebook, page 21, © Czech Games Edition; this site only makes the necessary local crop.
Each gold milestone tile has two sides:
| Category | One side | Other side |
|---|---|---|
| Technology | Each set of three different technologies | Every two technology tiles |
| Missions | Each completed mission | Each pair of completed missions and/or endgame cards |
| Income | Each set containing one credit, one energy, and one card income | Whichever is more numerous: credit- or energy-income cards |
| Other | Each pink-yellow-blue trace set; overflow counts | Pair sector wins with orbiters + landers and take the lower number |
The printed starting-income card does not count toward a gold income milestone. Repeated wins in the same sector count separately. Landers on moons also count.
Remaining credits, energy, publicity, ordinary cards, and data normally score nothing unless another rule refers to them. The highest score wins; tied players share the victory.
14. Space Agencies
The expansion has two layers:
- Add directly to the base game: shuffle the 42 project cards into the base deck without replacing any cards; mix the 3 alien species with the base species; add the 10 signal tokens.
- Use together as a module: 11 organizations and the quick start cards.
With only the first layer, play the normal 5 rounds. Organizations require quick starts and change the game to rounds 2–5, for 4 rounds total.
Organizations and Quick Starts
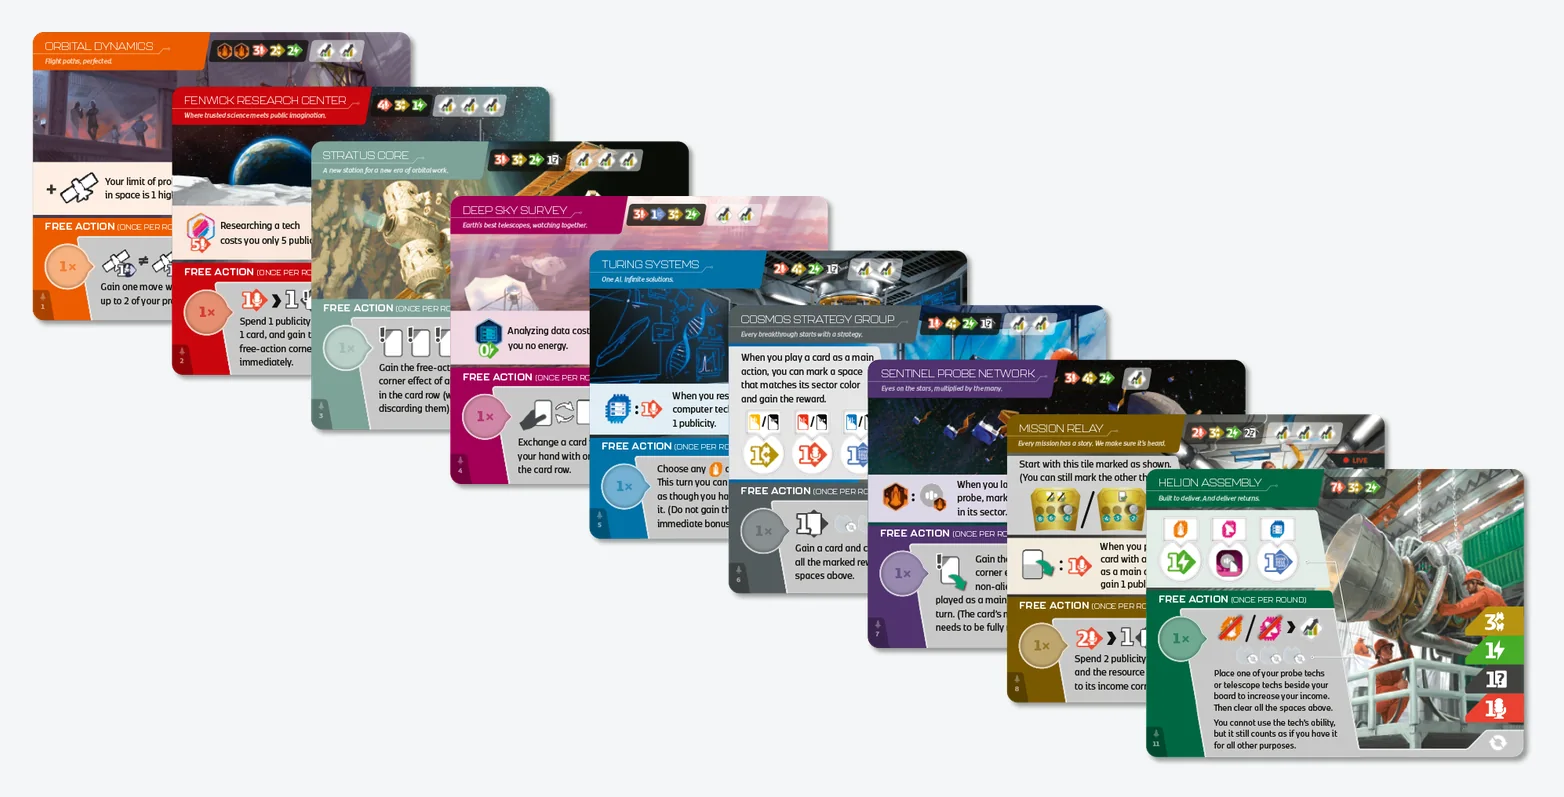
Figure: Eleven organizations with different starting resources and abilities. Official Space Agencies media assets, © Czech Games Edition; this site only trims transparent margins, resizes the image, and adds a neutral background.
When using organizations:
- Do not prepare round 1 or round 5 cards. Prepare stacks only for rounds 2, 3, and 4.
- Determine starting player and starting points normally. Everyone starts at 0 publicity.
- Deal each player 2 random organizations, 3 random quick starts, and 4 main-deck cards.
- Keep 1 organization, 2 quick starts, and all 4 hand cards.
- Everyone resolves both quick starts simultaneously, then gains the organization’s starting resources and effects.
- Begin round 2.
The upper half of a quick start places an orbiter, alien trace, or signal without gaining the location’s printed reward. The lower half grants starting resources, points, or another effect. Return the card to the box after resolution unless it explicitly becomes income.
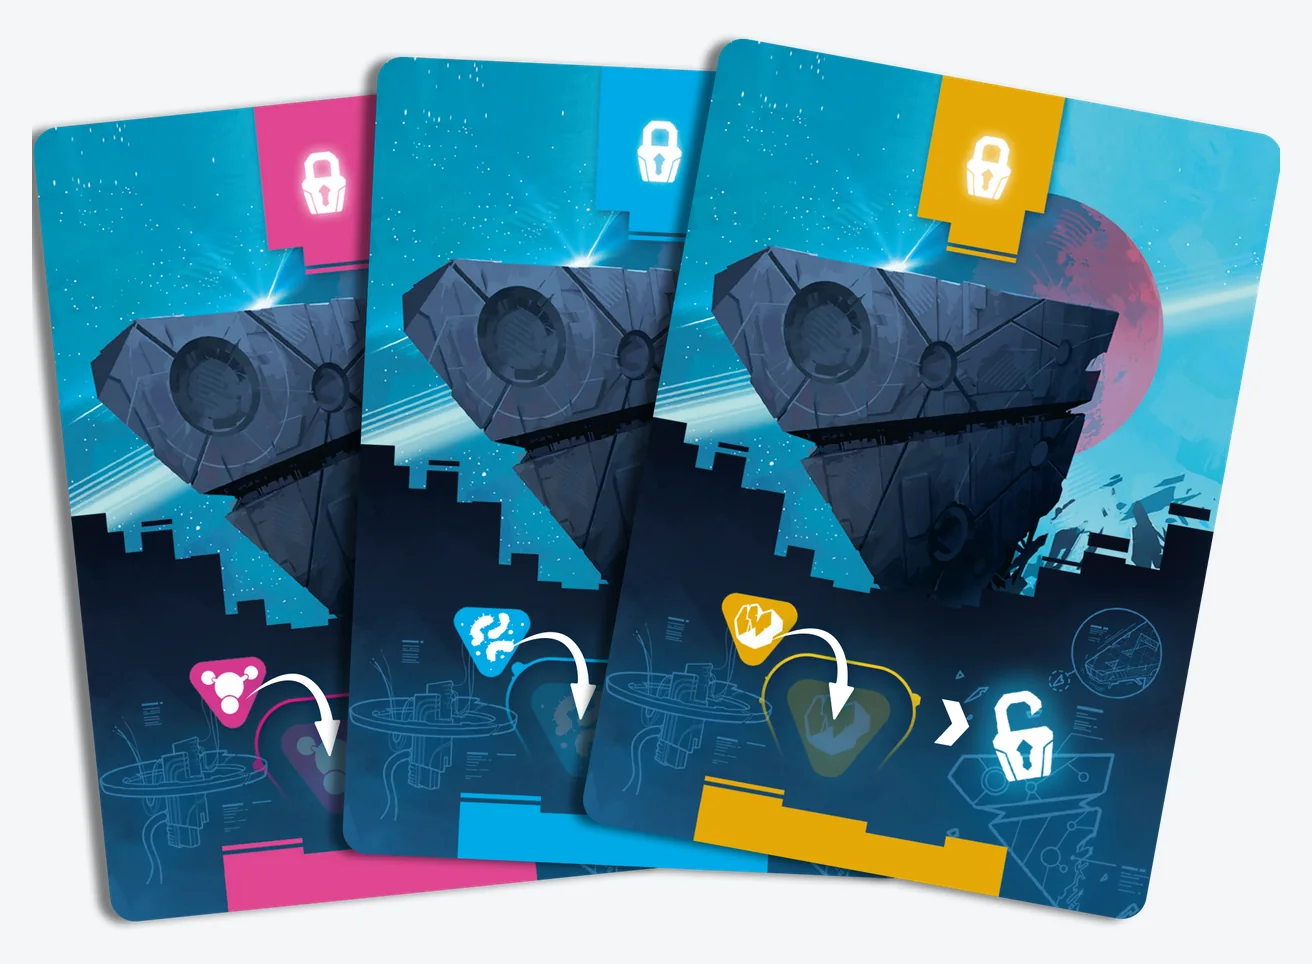
Figure: Quick starts replace round 1 with one placement and one effect. Official Space Agencies media assets, © Czech Games Edition; this site only trims transparent margins, resizes the image, and adds a neutral background.
An organization may show:
- starting resources;
- a passive ability;
- a once-per-round free action;
- income increases that tuck cards.
Gain starting resources and quick-start rewards before tucking income. Resolve two income increases separately; a card drawn by the first may be tucked for the second.
Do not collect organization income at the start of round 2. Collect it only at the start of rounds 3, 4, and 5. This also resets once-per-round abilities. Organizations are balanced for four rounds; a five-round organization game is not recommended.
Further Context — Specialization and comparative advantage
Comparative advantage asks which output has the lower opportunity cost. An organization makes a class of actions relatively cheaper by reducing costs, adding rewards, or changing resolution; a quick start supplies the chain’s initial positions and components. Conclusion: repeat the chain your organization improves, but recompare current position → main action → mission or milestone each round. Cards, species, or Solar System positions may temporarily make another chain cheaper.
For a first expansion game, use the official simplified setup. Use only organizations numbered 1–4; give each player 1 random organization, 2 quick starts, and 4 hand cards. Do not draft organizations or choose two of three quick starts.
In one- and two-player games, quick starts may be used without organizations. After players make their choices, reveal 4 random remaining quick starts. Resolve only their upper halves with an unused player color. Neutral signals act as one virtual player. With at most two signals, that player cannot win a sector, but it may take second place and leave a marker.
Solo setup still begins from the two-player rules. The rival receives no organization or quick starts, but:
- shuffle the 4 new rival action cards into its deck;
- start the rival at 4 publicity;
- above the lowest difficulty, use the difficulty II and III objective deck;
- add 2 random long-term objectives to the 3 difficulty II objectives, for 5 objectives total;
- remove completed long-term objectives without replacement;
- at the end of rounds 2, 3, and 4, each empty long-term-objective space advances the rival once; it adds no final-scoring penalty.
Signal Tokens
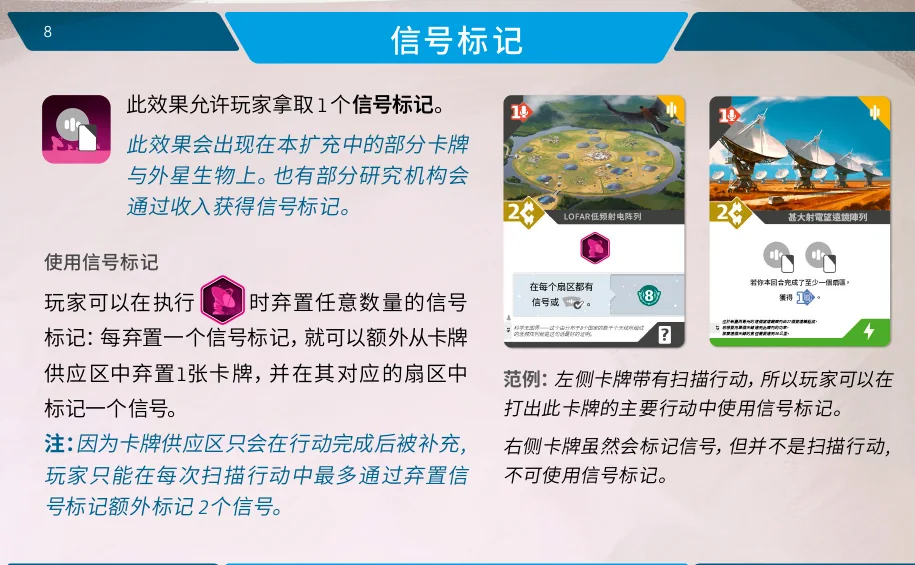
Figure: Gaining and using signal tokens, plus a counterexample. Official Simplified Chinese Space Agencies rulebook, page 8, © Czech Games Edition; this site only makes the necessary local crop.
Take 1 token from the common supply whenever an effect grants one. Tokens can be spent only during a Scan action:
- Discard any number of signal tokens.
- For each token, discard 1 additional card from the current card row.
- Choose one of that card’s two sector colors and mark a signal in a matching sector.
Refill the row after the entire scan. A basic scan already discards one of the three row cards, so normally at most 2 signal tokens can be used.
An effect that merely says “mark a signal” is not a Scan action and cannot spend signal tokens.
Three New Alien Species
Mix the 3 new boards with the 5 base-game species and choose 2 at random as usual. Discovery timing, contribution rewards, and overflow follow the base rules.
Spoiler-free summary:
- Origin Ark gradually opens deeper research areas.
- Glyphids ask the table to decode symbols together.
- Amoeba rewards move around its board.
Reveal complete rules summaries for all three new species (mechanical spoilers)
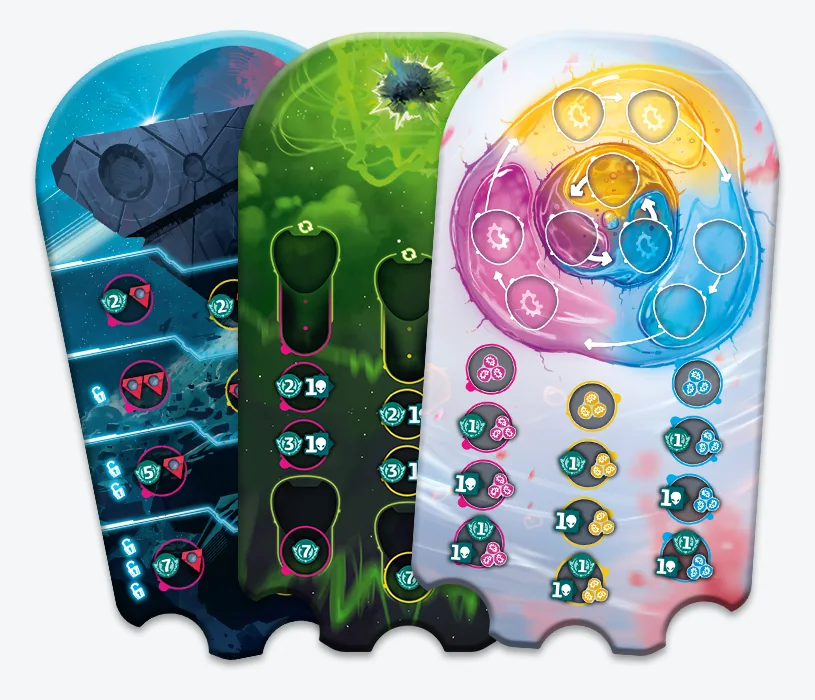
Figure: Origin Ark, Glyphids, and Amoeba. Official Space Agencies media assets, © Czech Games Edition; this site only trims transparent margins and adds a neutral background.
Origin Ark
At discovery:
- Shuffle 9 exploration cards, set 4 aside at random, and build a deck from the remaining 5.
- Reveal 1 exploration card for each player marker in a discovery space. That player gains its minor reward, then discards the card.
- Each player takes 3 alert cards of different colors and places them trace-side up. With fewer than four players, return unused alerts without looking at them.
The Ark has alert levels 0–3. Everyone begins with access only to level 0. The first time you mark an Ark overflow area of a color, unlock your matching alert card and put it in your hand:
- 1 unlocked card: access level 1;
- 2 unlocked cards: access levels 1–2;
- 3 unlocked cards: access every level.
Alert cards count toward the hand limit. Discard one for its free action to gain a minor exploration reward. Play one as a main action for 2 credits to gain a major reward. When the exploration deck runs out, shuffle all 9 cards, set aside 4, and rebuild the 5-card deck.
Glyphids
At discovery:
- Cover the species board with the decoding board and place both reward strips on random sides.
- Place random runes on the 6 species-board spaces, all 7 planets other than Earth, all 8 nearby stars, and every technology stack that still has its “first research +2 points” marker.
Take a rune when its condition is met. The conditions are: orbit or land at its planet or moon, win its sector, research its technology, or mark an alien trace on its species space. Refill the upper three species spaces at random from the reserve; other locations do not refill.
As a free action, place a rune you hold into an empty decoding space and gain its reward. An upper space requires both spaces below it to be filled. Each rune symbol can be decoded only once globally. A rune printed on a card grants its resource only after that symbol has been decoded; it does not grant a rune token.
At the end of the game, divide held runes into sets with no repeated symbol. Sets of 1–7 different runes score 1/3/5/8/11/15/20 points.
Some first-print reward strips show the same side twice. Use CGE’s official correction stickers; do not treat the misprint as a rules change.
Amoeba
At discovery:
- Shuffle 5 organelles and place them face up at random on the indicated spaces.
- Shuffle the 10 Amoeba cards.
- Give 1 card for each player marker in a discovery space, then reveal 1 face-up card for later acquisition.
Amoeba cards count toward the hand limit and may be tucked as income or discarded for their free action.
When marking an alien trace on the Amoeba board, gain the printed space reward and every organelle reward in that color region. Some Amoeba cards instead select 1 organelle reward in a specified region.
Each organelle that provided a reward then moves 1 space:
- clockwise on the outer ring;
- counterclockwise on the inner ring;
- over occupied spaces to the next empty space.
If several organelles provided rewards, move all of them.
15. Four Official Promo Cards
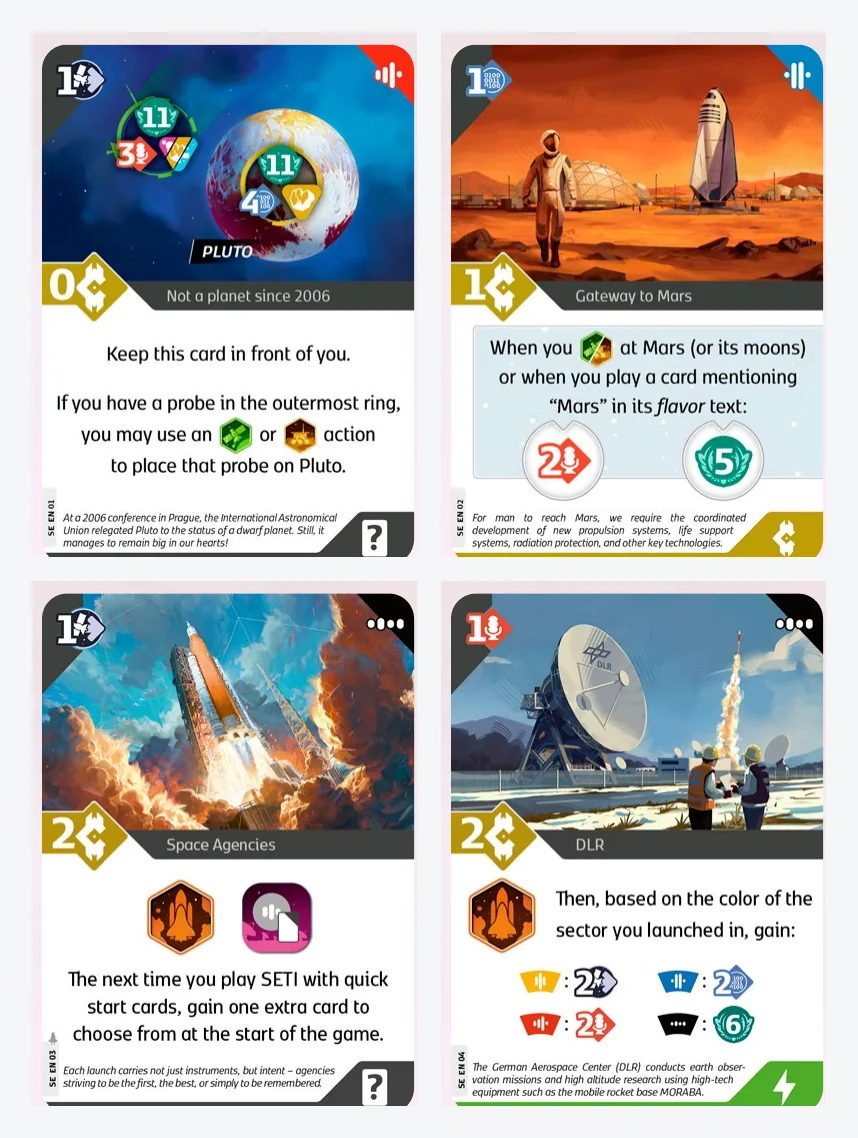
Figure: The four promo cards published by CGE as of this revision. Official promo-card rules, © Czech Games Edition; this site crops one card from each rule page and arranges them without altering the cards.
Shuffle each promo directly into the main deck. The Space Agencies promo needs signal tokens and quick starts, so include it only when the expansion is available.
Not a Planet Since 2006 (Pluto)
After playing the card as a main action, keep it in front of you. Its illustration becomes your personal Pluto.
- A probe in any space of the Solar System’s outer ring may use a later Orbit or Land action to move to the card.
- Orbit costs 1 credit and 1 energy.
- Land costs 3 energy, or 2 with your Pluto orbiter, and orange technology can reduce the cost.
- The card holds only 1 orbiter and 1 lander, and only its owner may use them.
- Pluto has no Solar System space, so visiting it cannot gain publicity.
- Pluto still counts as a planet for other effects, missions, and gold milestones.
- Cards #15 and #84 can remove its orbiter or lander; #16 may also allow another landing.
Gateway to Mars
Its two triggered-mission spaces may be marked by:
- orbiting or landing at Mars, Phobos, or Deimos;
- playing a card whose flavor text mentions “Mars” as a main action.
The qualifying base cards are #13, #14, #22, #34, #76, #84, #85, #119, and #ET.4. Space Agencies adds #31. If a card-granted landing action lands at Mars or one of its moons, the same event may mark both spaces.
Space Agencies
After playing it:
- Launch 1 probe for free.
- Gain 1 signal token.
- In the next game with organizations and quick starts, draw 1 extra quick start to choose from, but still keep only 2.
This effect carries between games. If the player group changes, seek everyone’s agreement before setup.
DLR
Launch for free, then gain a reward based on the sector aligned with Earth at the moment of launch:
- yellow: 2 movement;
- blue: 2 data;
- red: 2 publicity;
- black: 6 points.
Use Earth’s sector at launch, not the probe’s later destination.
The official upgraded components only replace the physical credits and energy; they add no rules. The Solar System randomizer generates a disc and sector layout and also adds no rules.
Recommended order:
- Learn the base game.
- Permanently add the 42 project cards, 3 species, and signal tokens.
- Enable organizations and quick starts together when you want asymmetric powers.
- Add promo cards as desired.
16. First-Game Reference
Setup Check
- The three central boards are assembled.
- Two alien-species boards are face down.
- Eight sectors are clearly bounded and each star’s data slot is filled to its printed capacity.
- The card row has 3 cards.
- Gold milestones are on random sides and neutral milestone markers are correct.
- All 12 technology stacks and first-research markers are ready.
- Round 1–4 card stacks are ready.
- Every player has the correct resources, publicity, hand, and tucked income.
Turn Check
- Free actions may be inserted before or during the main action; complete 1 main action each turn.
- Resolve completed sectors when the main action ends.
- Free actions may continue.
- At turn end, resolve milestones before alien discovery.
Common Errors
- A newly launched probe may move during the same turn.
- Leaving an asteroid costs extra movement; entering it does not.
- An orbiter cannot become a lander. Any player’s orbiter reduces your landing cost.
- Signals are mandatory. Excess signals still count for the majority.
- Refill the card row only after the whole scan.
- Sector ties go to the marker placed later.
- The data pool holds 6. Analysis clears the computer, not the pool.
- A free action may interrupt a main action but cannot interrupt another free action.
- Increasing income grants the lower-right reward immediately.
- Discard down to 4 cards only when passing.
- Alien traces are mandatory, but overflow may be chosen.
- Rotate before gaining every technology; the first player to pass also rotates.
- Resolve milestones at turn end and before alien discovery.
- Collect no income after round 5.
- Ordinary leftover resources normally do not score. Tied players share the win.
Give the starting-player marker to the player who most recently saw a UFO and begin round 1.
Comments
Comments are public and stored in GitHub Discussions. This page connects to giscus.app and GitHub and sends the current page path only after you show comments manually or enable automatic loading. The first load is about 0.13 MB; actual usage varies with comment content. Do not include private information.