
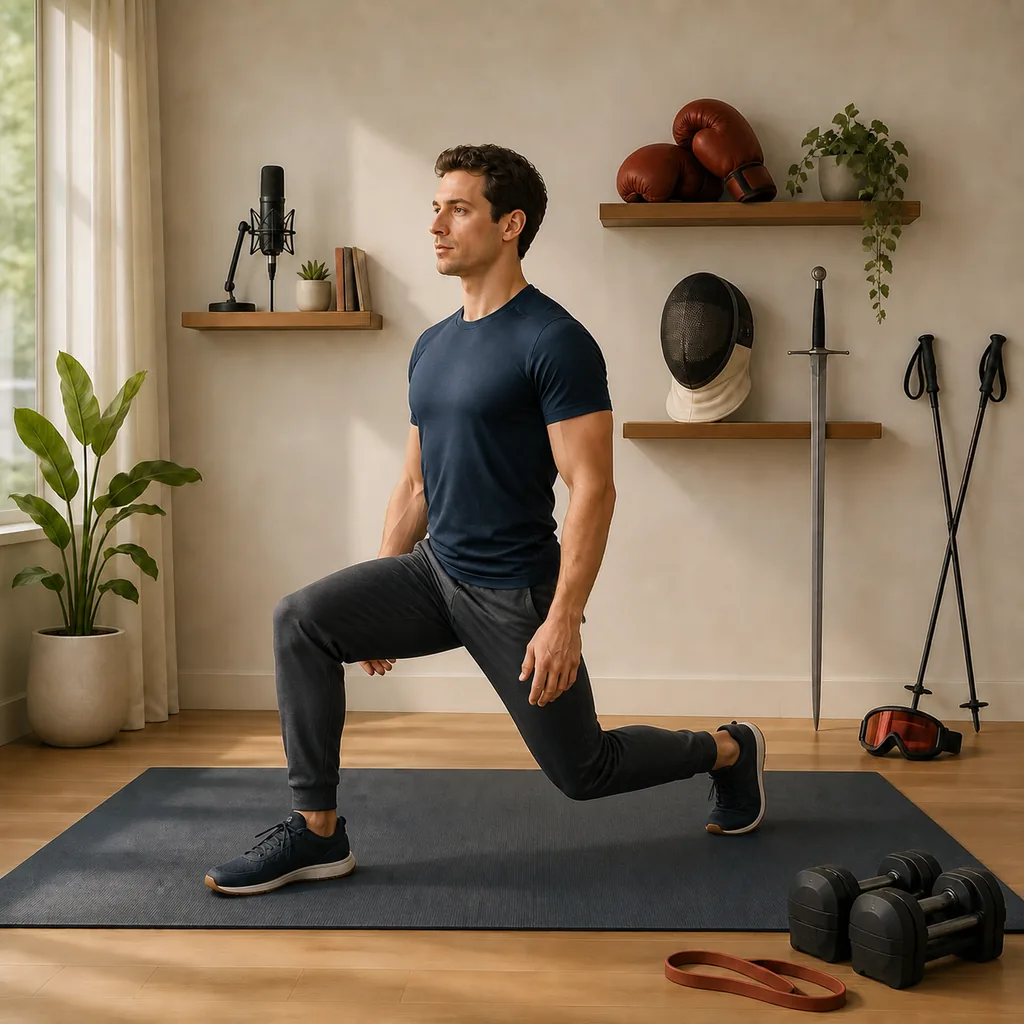
Starting point, boundaries, and success criteria
This system begins from a specific state: a twenty-eight-year-old man, 168 cm tall and 65 kg, with no dedicated fitness equipment and no scheduled singing, boxing, historical European martial arts (HEMA), or skiing sessions. Muscle appearance is the first objective. The second is economical maintenance after the growth phase, while retaining strength that can serve those pursuits.
The plan assumes no active joint or tendon pain, recent surgery, medical exercise restriction, or exercise-induced chest pain, fainting, or unusual shortness of breath. If any assumption is false, a physician or qualified rehabilitation professional should adapt the plan first. Stop an exercise immediately if it produces sharp pain, numbness, loss of control, or symptoms that worsen from set to set. Ordinary muscular effort and mild next-day soreness are different signals.
Four auditable measures decide whether the plan works: load or clean repetitions increase on the same movement; monthly photographs and circumferences of the shoulders, back, hips, legs, and waist move toward the goal; hobby practice is not repeatedly damaged by soreness and fatigue; and at least eighty percent of planned sessions are actually completed. A single workout’s pump, one day’s body-weight fluctuation, and changes in mirror lighting do not measure hypertrophy.
The abdominal muscles do not atrophy because they went a few days without direct work. A short-term “flatter” appearance often comes from changes in pump, muscle glycogen, water, gut contents, and lighting. Actual muscle loss needs a longer period of insufficient stimulus and is affected by total activity, energy, and protein intake. The abs should progress like other muscles; maintenance usually requires markedly less volume than building them did.
Shared muscle priorities across five goals
Five goals do not require five unrelated bodies. Boxing, HEMA, and skiing all generate force from the ground, control the trunk in single-leg or staggered positions, and transfer that force to the upper body. The shoulder-to-waist appearance also depends heavily on the deltoids, latissimus dorsi, and upper back. Singing mainly asks the trunk for posture, respiratory coordination, and controlled exhalation. The diaphragm contracts during inhalation, but it should not inherit a biceps-style prescription of isolation work to failure.
| Priority and muscle groups | Why they come first | Weekly building target |
|---|---|---|
| Tier one: lateral and rear deltoids, latissimus dorsi, middle and lower trapezius, and rhomboids | They most directly change shoulder width and the upper-body outline; they also support pulling, scapular control, upper-body force transfer in boxing and fencing, and posture | About 8–12 hard sets for each large region |
| Tier one: gluteus maximus, quadriceps, and hamstrings | They determine much of hip and thigh size and form the shared base for punching force, HEMA footwork, skiing deceleration, and hip-knee stability | About 8–12 hard sets for each large region |
| Tier two: pectorals, triceps, and biceps | They complete the front view and pushing-pulling capacity; compound lifts already supply much of their stimulus | About 4–8 hard sets for each large region |
| Tier two: rectus abdominis, obliques, spinal erectors, serratus anterior, and rotator cuff | They let the trunk resist extension, side-bending, and rotation while the scapula moves stably during punching, fencing, and overhead work | About 4–8 sets for large regions; 2–4 direct sets for small stabilizers |
| Tier two: gluteus medius, adductors, calves, tibialis anterior, forearms, and grip | They support single-leg stability, lateral movement, ankle control, weapon handling, and carrying; their visual return is smaller but their utility is high | About 2–6 direct hard sets per region |
| Conditional tier: neck | It may offer a limited contribution to contact-sport preparation and appearance, but should not be claimed to prevent concussion | Add only 2–4 light isometric sets after recovery is stable |
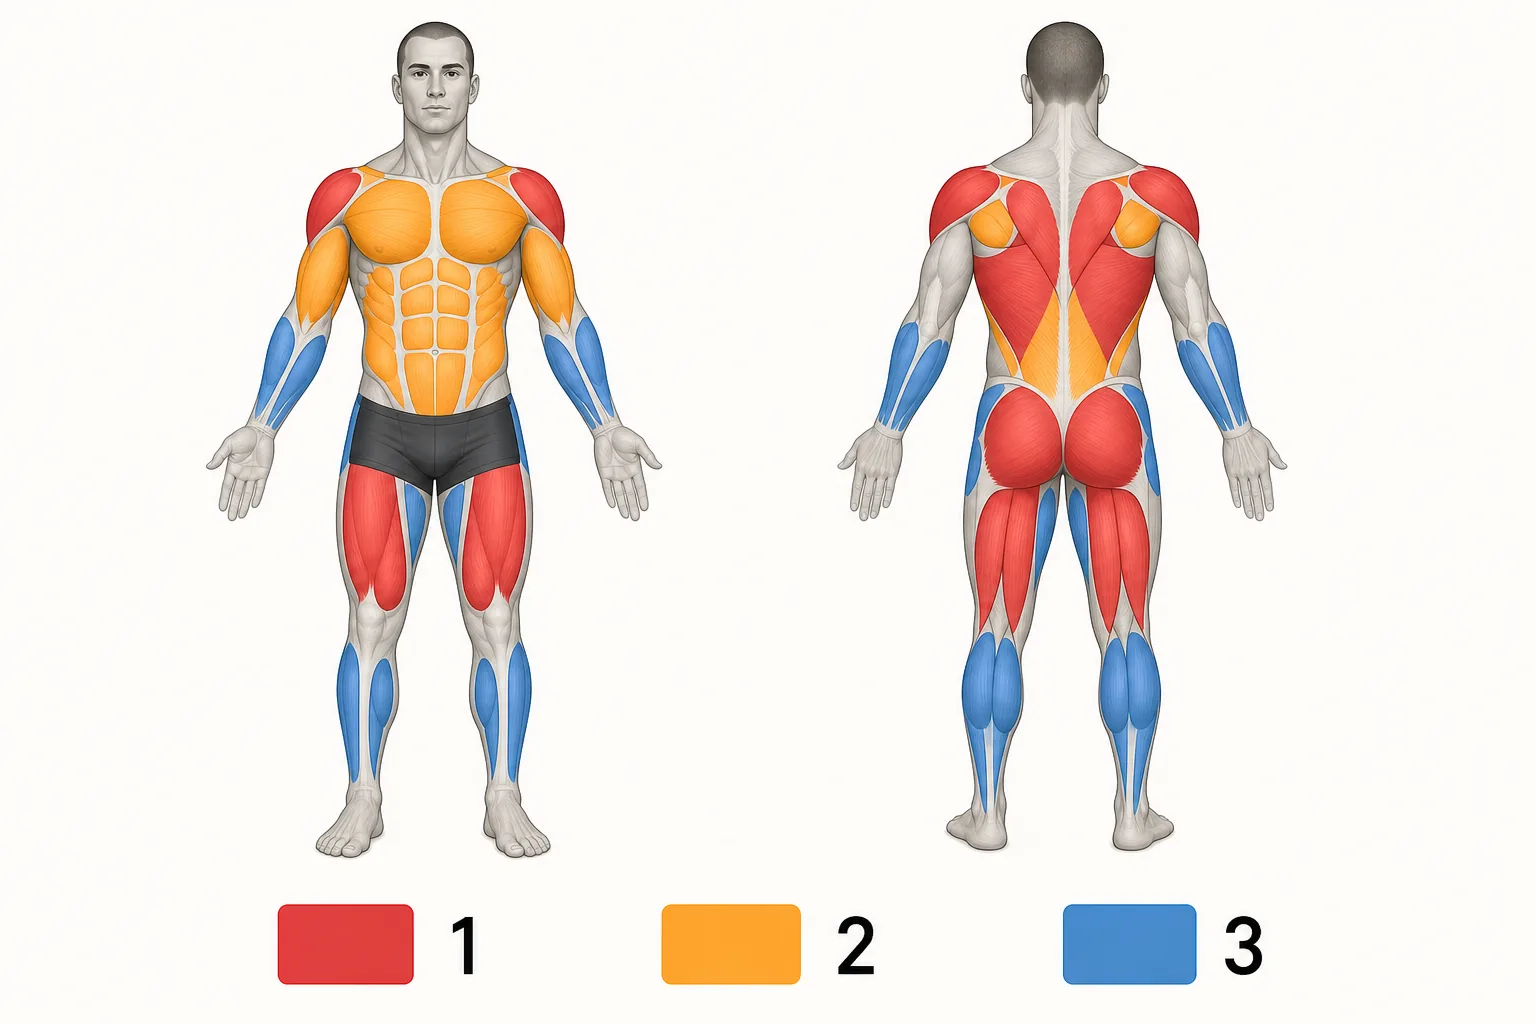
Figure 1 — Muscle locator. Red 1 marks the first-tier appearance and shared force base; amber 2 marks the chest, arms, trunk, and scapular stabilizers; blue 3 marks smaller-volume regions that still support single-leg control, the ankle, and grip. The neck remains gray as a conditional tier. This AI-generated locator is for orientation only; the prose governs muscle boundaries and training decisions.
A “hard set” uses clean technique, is genuinely limited by the target muscles, and ends with roughly 1–3 clean repetitions still available. Warm-up sets do not count. A compound movement can count toward adjacent muscle groups: a push-up trains both the chest and triceps, while a row trains the upper back and biceps. These numbers are adjustment ranges, not physiological quotas that require exact accounting.
A twelve-week macro progression
The first twelve weeks build movements, reveal bottlenecks, and establish maintainable volume. They do not require predicting the perfect equipment for the next year on day one.
| Phase | What to do | Condition for moving on |
|---|---|---|
| Week 0: establish a baseline | Weigh on three consecutive mornings and average the results; measure waist, shoulders, and hips; take front, side, and back photographs in the same light; choose a version of each movement that leaves about three repetitions in reserve | You can record the version, clean repetitions, and stopping reason for every movement |
| Weeks 1–2: movement adaptation | Perform only 2 sets of each listed movement; replace jumps with a lateral step and hold; keep about three repetitions in reserve; record joint sensations and next-day recovery | All three sessions fit into roughly 60 minutes without technique deteriorating from set to set |
| Weeks 3–6: accumulation | Use the full listed set counts; progress through the repetition ranges; perform low-repetition power work only while attention and landing quality are good | At least one main movement gains repetitions, difficulty, or load in each of two consecutive weeks |
| Week 7: reduced-volume audit | Halve the work sets, retain the same movements, and leave about four repetitions in reserve; compare sleep, soreness, willingness to train, and movement performance | Fatigue subsides; if pain or performance still worsens, address the cause before adding volume |
| Weeks 8–10: solve bottlenecks | Buy equipment only when a bodyweight movement has reached its repetition ceiling, the back lacks reliable pulling resistance, or improvised home loading has become unsafe; introduce only one new variable per week | The new equipment movement can be reproduced stably in two consecutive sessions and remains comparable with the old log |
| Weeks 11–12: consolidate | Stop changing exercises; in week 12, repeat photographs, circumferences, and same-movement performance; choose whether the next block builds, maintains, or yields volume to actual hobbies | The log can explain which muscle group needs more, the same, or less work |
Progress uses double progression. First add clean repetitions at the same movement and difficulty. When every work set reaches the top of the range in two consecutive sessions and still ends with about two repetitions in reserve, add the smallest load. When load cannot be added, progress in this order: more repetitions, a three-second lowering phase, a pause at the bottom, a larger safe range of motion, and a unilateral version. Change one variable at a time so the source of progress remains visible.
Weekly training schedule
With no specialist sessions currently scheduled, perform full-body days A, B, and C on Monday, Wednesday, and Saturday. The weekdays may shift, but leave at least one day between adjacent sessions. The row order in each table is the exercise order: complete the large movements near the top before smaller muscles. Rest until breathing is largely settled and the next set can retain its form: usually 2–3 minutes for compound movements and 60–90 seconds for smaller work.
The “how to do it now” column requires no dedicated purchase, but it may use a wall, the floor, the lowest stair, and everyday objects such as a sturdy backpack with intact zips and stitching, sealed water bottles, a towel, or a pillow. Do not use furniture or public equipment that moves, is wet, has sharp edges, or has uncertain load capacity.
The schedule, figures, and instruction use one naming system. L means lower body, U upper body, C trunk and adductors, and F forearms; voice steps use V and equipment categories use E. The codes are lookup aids, not priorities. Each movement area has two card groups: group A contains movements 1–4 and group B movements 5–8. Cards use two columns on desktop and one full-width movement per row on a phone. For example, “Figure 2A-1 = L1 — Stable lateral landing.” Tables, cards, and instruction headings use exactly the same names, and selecting any linked name jumps to its instruction. “How to do it now” identifies only the regression, variation, or household object used that day.
How to start each session
Begin with 3–5 minutes of brisk walking, marching in place, or easy stairs. Then perform 6 cat-cow repetitions, 6 unloaded hip hinges per side, 6 reverse steps per side, and 8 scapular push-ups. Do one easy warm-up set for the first lower-body movement and the first upper-body movement. A completed warm-up should leave the body warmer and moving more freely, not fatigued.
Day A: shoulders and back, hip hinge, and foundational push
| Movement (identical to instruction heading) | How to do it now | Work sets from week 3 |
|---|---|---|
| L1 — Stable lateral landing (Figure 2A-1) | Step laterally and hold in weeks 1–2; later use a small lateral bound and hold | 3 × 3/side |
| L2 — Split squat (Figure 2A-2) | Keep both feet in place for the whole set; touch a wall if needed | 3 × 8–15/side |
| U3 — One-arm row (Figure 3A-3) | Use a sturdy backpack and grip both straps near the bag | 3 × 10–20/side |
| U1 — Push-up (Figure 3A-1) | Choose an incline on a stable surface or the basic floor version | 3 × 6–20 |
| L3 — Hip hinge (Figure 2A-3) | Learn unloaded with a wall touch, then use the backpack as a Romanian-deadlift-style hinge | 3 × 8–15 |
| U5 — Lateral raise (Figure 3B-5) | Use two sealed water bottles of equal capacity | 3 × 12–25 |
| C1 — Dead bug (Figure 4A-1) | Alternate opposite arm and leg | 2 × 6–10/side |
| L7 — Calf raise (Figure 2B-7) | Touch a wall and begin with both legs | 2 × 15–25 |
| L8 — Tibialis raise (Figure 2B-8) | Lean on a wall and lift only the forefeet | 2 × 15–25 |
Day B: unilateral legs, overhead push, and posterior chain
| Movement (identical to instruction heading) | How to do it now | Work sets from week 3 |
|---|---|---|
| U1 — Push-up (Figure 3A-1) | Use the fast-concentric variation: hands stay down and the ascent is as fast as possible | 3 × 3–5 |
| L2 — Split squat (Figure 2A-2) | Use the reverse-lunge variation: step one foot back before each vertical descent | 3 × 8–15/side |
| U3 — One-arm row (Figure 3A-3) | Use the sturdy backpack | 3 × 10–20/side |
| U2 — Pike push-up (Figure 3A-2) | Raise the hips into an inverted V; elevate the hands if needed | 3 × 6–15 |
| L6 — Bridge walkout (Figure 2B-6) | Begin at the top of a bridge and take small heel steps out and back | 3 × 6–15 |
| U7 — Push-up plus (Figure 3B-7) | At the straight-arm top, continue pushing the ground away | 2 × 12–20 |
| C4 — Pillow adductor squeeze (Figure 4B-5) | Lie with bent knees and squeeze a pillow evenly between them | 2 × 20–30 seconds |
| C3 — Side plank (Figure 4A-3) | Begin with bent-knee support | 2 × 20–40 seconds/side |
Day C: hips and legs, second push-pull exposure, and forearms
| Movement (identical to instruction heading) | How to do it now | Work sets from week 3 |
|---|---|---|
| L1 — Stable lateral landing (Figure 2A-1) | Use a small lateral bound and hold; still use only a step in weeks 1–2 | 3 × 3/side |
| L4 — Glute bridge (Figure 2A-4) | Use the two-leg floor version and pause two seconds at the top | 3 × 10–20 |
| L5 — Low step-up (Figure 2B-5) | Use only the lowest fixed stair; substitute the basic L2 split squat if none is safe | 3 × 8–15/side |
| U3 — One-arm row (Figure 3A-3) | Use the sturdy backpack | 3 × 8–20/side |
| U1 — Push-up (Figure 3A-1) | Use the close-grip variation: move the hands slightly inward without forming a diamond | 3 × 8–20 |
| U5 — Lateral raise (Figure 3B-5) | Use two sealed water bottles of equal capacity | 2 × 12–25 |
| U6 — Bent-over reverse fly (Figure 3B-6) | Use bottles substantially lighter than the row load | 2 × 12–25 |
| C2 — Reverse crunch (Figure 4A-2) | Curl the pelvis through a small range without swinging the legs | 2 × 8–15 |
| F1 — Wrist extension (Figure 4B-8) | Fix the forearm and raise the back of the hand with a light bottle | 2 × 12–20/side |
| F2 — Forearm pronation-supination (Figure 4A-4) | Keep the elbow at the side and rotate a bottle held at its middle | 2 × 12–20/side |
The twenty-minute floor for busy days
A short day does not invalidate the week. Keep four movements and perform 2–3 rounds: L2 — Split squat for 8–15 repetitions per side, U1 — Push-up for 6–20, U3 — One-arm row for 10–20 per side, and L3 — Hip hinge for 8–15. Use the bodyweight, backpack, or incline versions specified in the schedule. Rest as needed; do not turn the movements into a heart-rate circuit. Resume the normal schedule next time and do not repay missed volume.
A completely unencumbered travel substitute
During a short trip, the following table can replace any one A, B, or C session that week. Find level, non-slip ground that does not obstruct other people. If no clean ground is available, remove supine and prone movements rather than loading an ordinary bench of uncertain stability.
| Movement (identical to instruction heading) | Travel version | Sets and repetitions |
|---|---|---|
| L1 — Stable lateral landing (Figure 2A-1) | Step laterally and hold; use a small bound only after mastery | 3 × 3/side |
| L2 — Split squat (Figure 2A-2) | Stationary and unloaded | 3 × 10–20/side |
| U1 — Push-up (Figure 3A-1) | Basic floor version | 3 × 6–20 |
| L3 — Hip hinge (Figure 2A-3) | Kickstand single-leg version with rear toes down | 3 × 10–20/side |
| U2 — Pike push-up (Figure 3A-2) | Floor version | 2 × 6–15 |
| L6 — Bridge walkout (Figure 2B-6) | Floor version | 3 × 6–15 |
| U8 — Prone Y–T–W (Figure 3B-8) | Complete each letter separately | 2 × 8–12 for each letter |
| C2 — Reverse crunch (Figure 4A-2) | Small pelvic curl | 2 × 8–15 |
| C3 — Side plank (Figure 4A-3) | Bent-knee or straight-leg version | 2 × 20–40 seconds/side |
| L7 — Calf raise (Figure 2B-7) | Single-leg version | 2 × 15–30/side |
| L8 — Tibialis raise (Figure 2B-8) | Wall version | 2 × 15–30 |
This table has no reliable progressive pulling resistance, and prone Y–T–W work does not replace rows or pulldowns. It can maintain a short trip but should not become a multi-month hypertrophy plan. For travel beyond one week, take an intact long band and compatible anchor or find a fixed pull-up bar whose safety can be established. If neither exists, accept less back training temporarily instead of improvising with tree branches, decorative railings, or unknown furniture.
Movement instruction: lower body and power
Figure 2A | Lower-body movements 1–4 Select any card to jump to its identically named instruction.
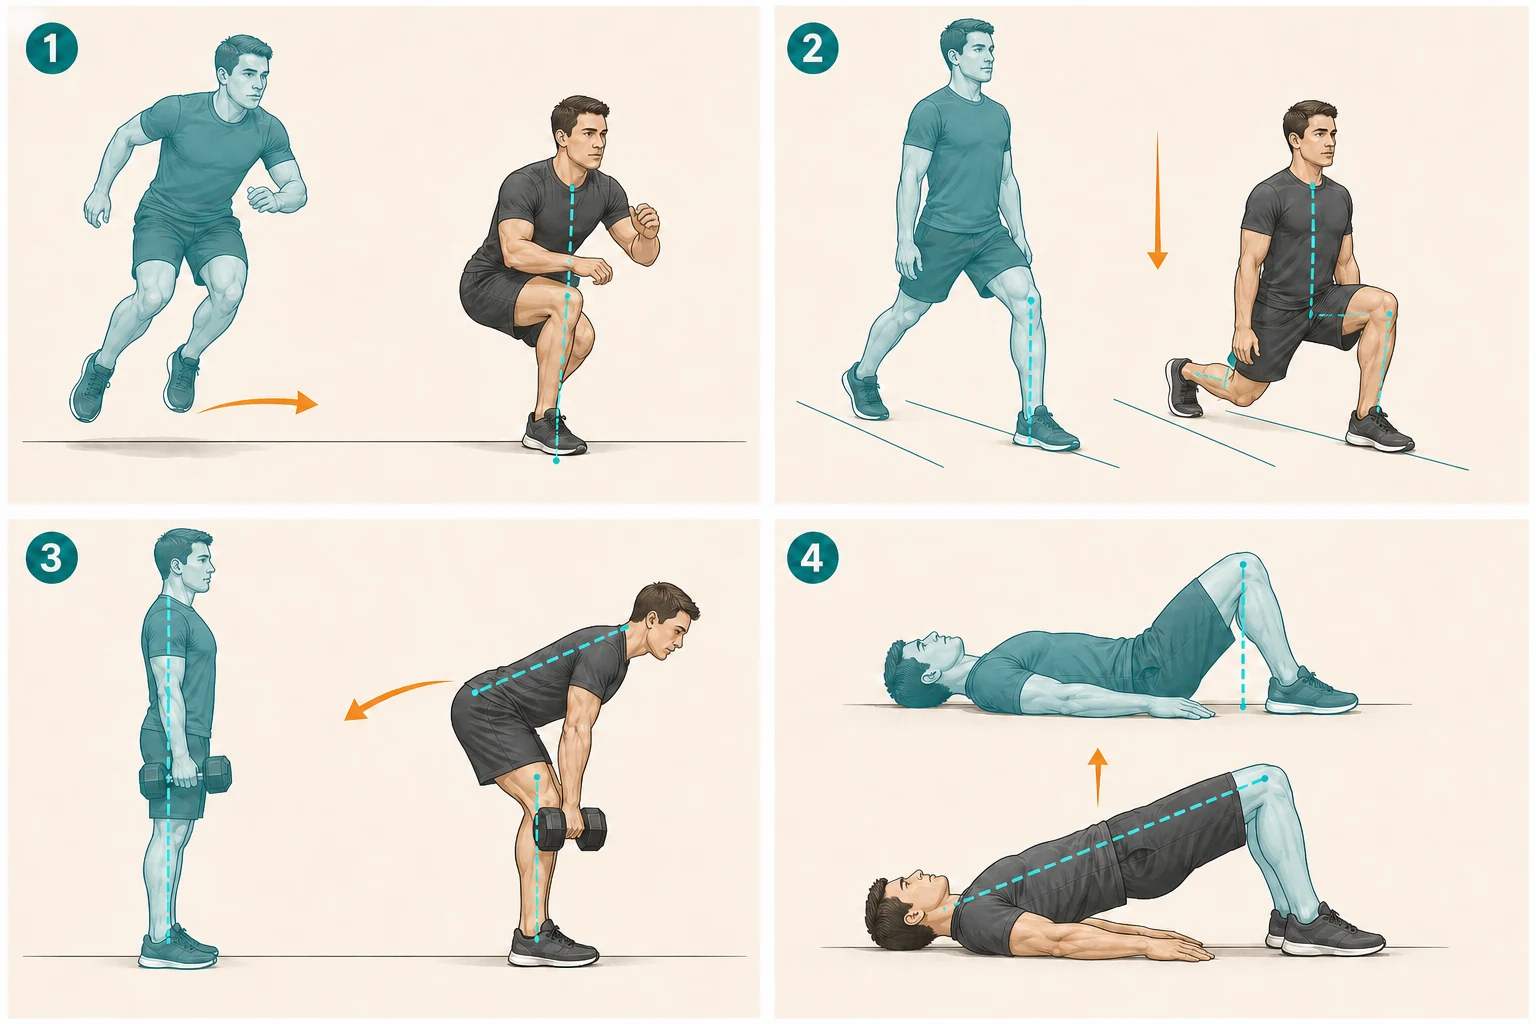
Teal marks a start or regression, charcoal a finish, and orange arrows the direction of travel. Figure 2A-3 shows dumbbells; the body movement is the same with the current backpack version.
L1 — Stable lateral landing (Figure 2A-1)
- Setup: Stand about hip-width with the hips and knees slightly flexed. Keep the tripod of the base of the big toe, base of the little toe, and heel on the ground.
- How to do it now: In weeks 1–2, step sideways and hold on one leg for two seconds. From week 3, use a small lateral bound. Let the foot, knee, and hip absorb the landing in sequence while the knee tracks toward the second and third toes.
- Pass standard: Each landing is quiet, can be held for two seconds, and covers a similar distance on both sides. End the set if distance falls or consecutive landings lose stability; do not take this movement to failure.
- Stop rule: Cancel jumping for the day and return to the step version if the knee, ankle, or Achilles tendon hurts.
L2 — Split squat (Figure 2A-2)
- Setup: Place the feet roughly one stride apart on two parallel lines. Keep the whole front foot down and support the rear foot on its forefoot. Touch a wall with the fingertips only as much as balance requires.
- How to do it now: On day A, keep both feet planted for the set. On day B, use the reverse-lunge variation: step one foot back to the same place before bending both knees and descending vertically. Push through the front foot to rise.
- Pass standard: The front heel remains down, the front knee follows the toes, the front glute and thigh do most of the work, and the pelvis does not drop sideways.
- Progression: Deepen the range, add a three-second lowering phase, then add backpack or dumbbell load. A rear-foot-elevated Bulgarian split squat is a later optional hard version, not the current movement or a required milestone.
L3 — Hip hinge (Figure 2A-3)
- Setup: Stand about hip-width with soft knees. First practise unloaded by sending the hips back toward a wall, distinguishing a hinge from a squat.
- How to do it now: On day A, keep a secured backpack near the thighs, send the hips back, and let the bag descend along the legs. Stand when the hamstrings are clearly lengthened and the back remains stable. The travel table uses a kickstand single-leg version with rear toes down.
- Pass standard: The shins remain roughly vertical, ribs and pelvis remain relatively fixed, and the neck continues the line of the spine. Squeeze the glutes when standing without leaning backward.
- Backpack safety: Close the zip, secure the contents, and grip both shoulder straps near the bag rather than one top handle. Add repetitions, a three-second lowering phase, and then load.
L4 — Glute bridge (Figure 2A-4)
- Setup: Lie on the back with bent knees and heels roughly one foot-length from the hips. Keep the feet stable on the floor.
- How to do it now: Gently tuck the chin and settle the ribs, push the feet into the floor, and raise the hips. Bring knees, hips, and shoulders near one line, pause for two seconds, and lower slowly.
- Pass standard: The glutes fatigue first, the knees do not collapse inward, and the lower back does not arch to gain height. If the hamstrings cramp, move the feet slightly closer and reduce the height.
- Progression: Extend the top pause, then use a single-leg version. Add a secured backpack or dumbbell at the padded hip crease only after a reliable load is available, and stabilize it with the hands.
Figure 2B | Lower-body movements 5–8 Select any card to jump to its identically named instruction.
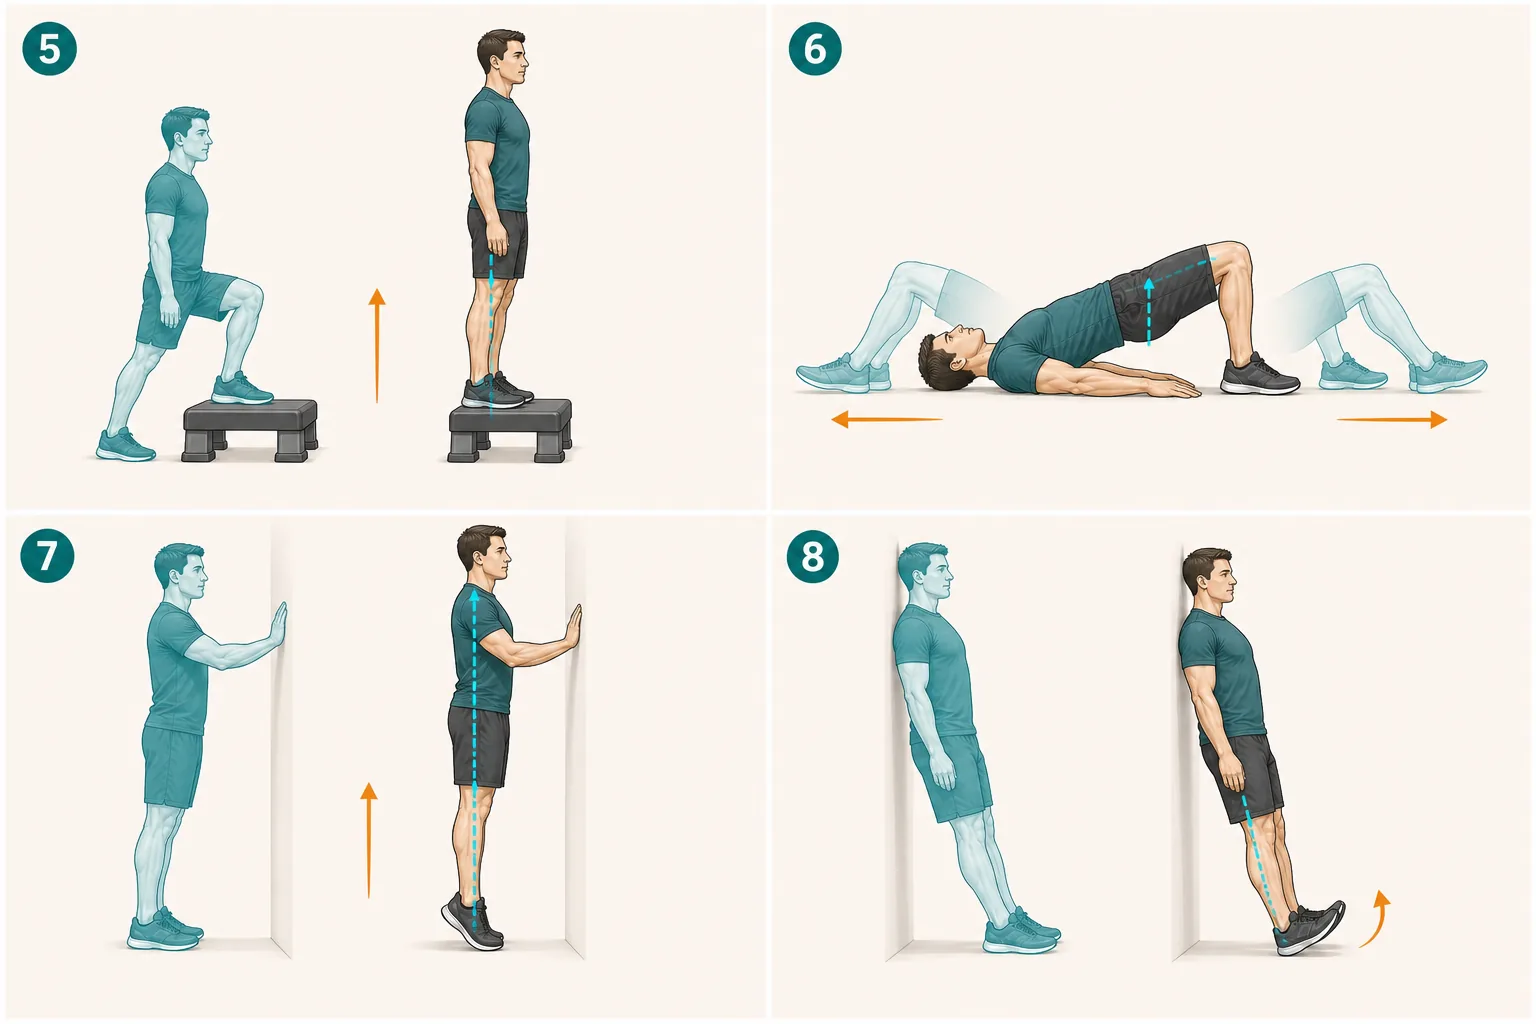
The low platform represents a load-rated training step with four non-slip contacts. If none is available, use the written L2 substitution rather than an ordinary chair.
L5 — Low step-up (Figure 2B-5)
- Setup: Use only the lowest fixed stair or a training platform with a known load rating, never an ordinary chair. Place the entire working foot on the surface.
- Action: Let the upper leg raise the body while the lower foot only touches lightly, then use the same leg to control the descent.
- Pass standard: The platform does not move, the working knee follows the toes, and the lower leg does not spring the body upward. Substitute the basic L2 split squat if no suitable step exists.
- Stop rule: Stop for sharp internal knee pain, platform movement, or an uncontrolled descent.
L6 — Bridge walkout (Figure 2B-6)
- Setup: Complete L4 and pause at the top with the heels about one foot-length from the hips.
- Action: Keep the hips raised, alternate small heel steps forward, and then walk them back. One trip out and back is one repetition.
- Pass standard: The hamstrings work, the pelvis stays level, and the back does not arch. Begin with a short distance and do not drop the hips merely to count repetitions.
- Regression and later version: Shorten each step or reset the hips after each repetition. With sliders and a suitable floor, it may be replaced by a two-leg sliding curl; do not alternate the two versions in the current plan.
L7 — Calf raise (Figure 2B-7)
- Action: Touch a wall, raise the heels to the highest comfortable point, pause for one second, and lower for 2–3 seconds. Day A begins with two legs; the travel table may use one leg.
- Pass standard: Do not bounce, and do not let the heels roll inward or outward. Reduce range and stop progression if the Achilles tendon or sole hurts.
L8 — Tibialis raise (Figure 2B-8)
- Action: Lean the back against a wall with the feet half a step forward. Keep the heels down, lift only the toes and forefeet, and lower slowly. Moving farther from the wall is harder.
- Pass standard: The ankle moves in line with the foot and the body does not swing to create repetitions. Reduce range and stop progression if the shin or front of the ankle hurts.
Movement instruction: push, pull, and scapula
Figure 3A | Upper-body movements 1–4 Select any card to jump to its identically named instruction.
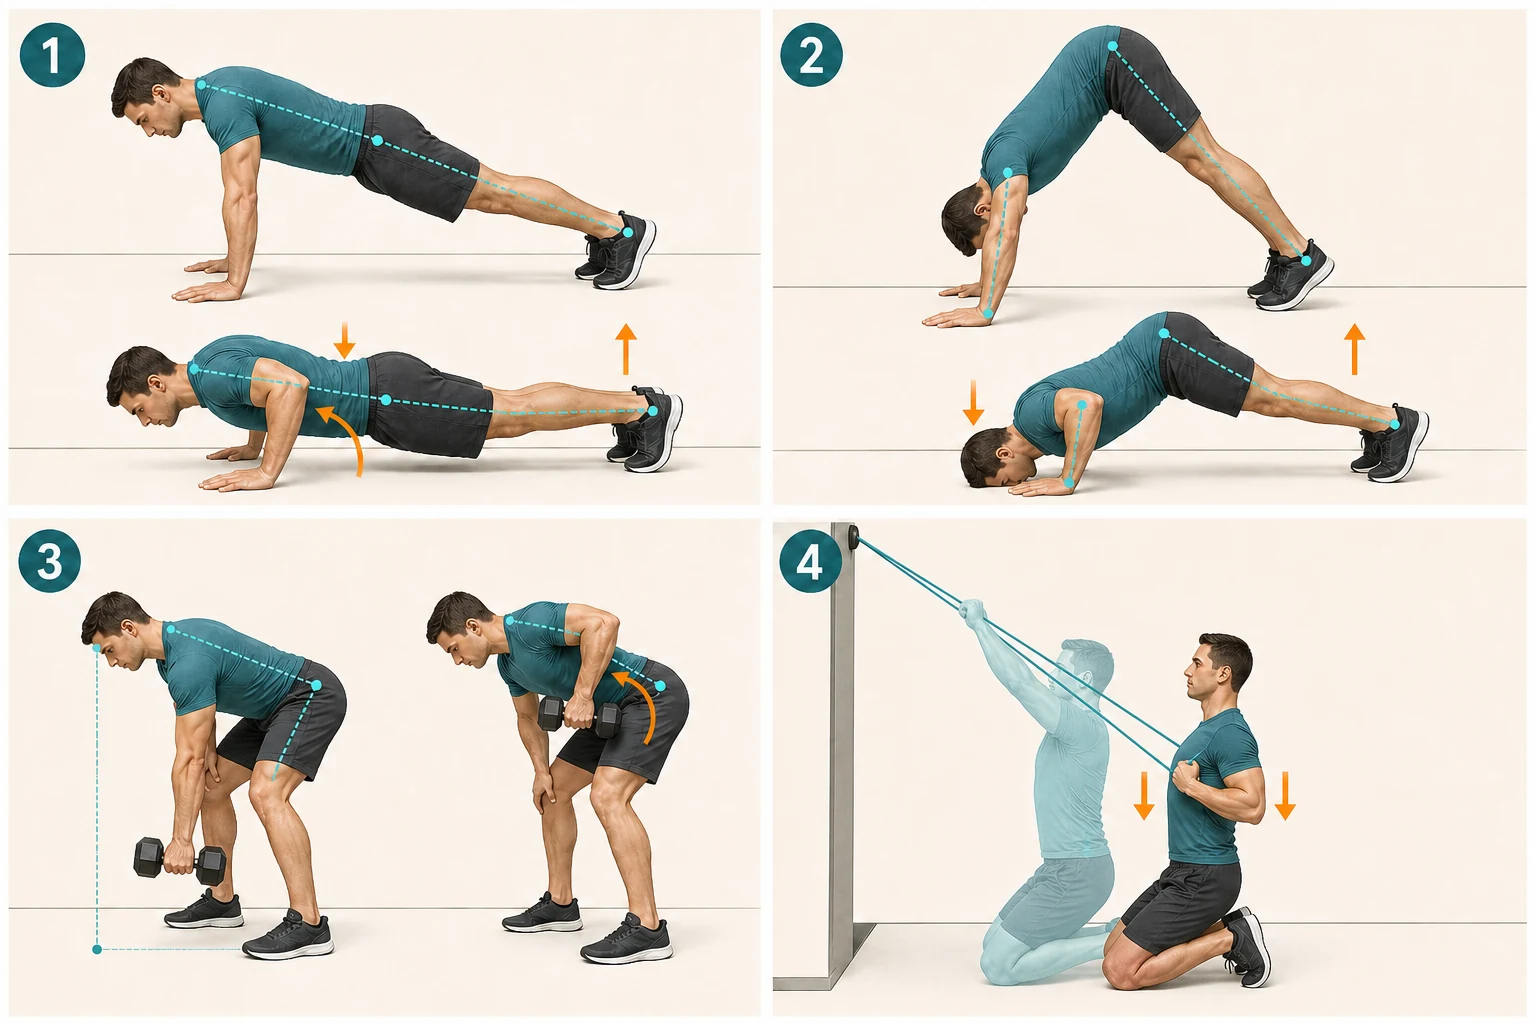
Teal marks the start, charcoal the finish, and orange arrows the direction of travel. Figure 3A-3 shows a dumbbell while the current version uses a backpack. Figure 3A-4 begins only after E1 and a compatible anchor have been purchased.
U1 — Push-up (Figure 3A-1)
- Setup: Place the hands slightly wider than the shoulders with fingers spread, and hold a controllable line from head to heel. If the floor version is too difficult, use a stable incline surface braced against a wall.
- Basic action: Let the elbows form roughly 30–60 degrees with the trunk, lower the chest toward the floor or surface, and push away. Chest and hips rise together, the lower back does not sag, and the shoulders do not shrug.
- Day B fast-concentric variation: Keep the hand position and contact with the ground, but make the ascent as fast as possible. Perform 3–5 repetitions and stop when speed falls.
- Day C close-grip variation: Move the hands slightly inward while keeping the forearms near vertical at the bottom; a diamond is unnecessary. Add repetitions in the same version before lowering the incline or adding a three-second descent.
U2 — Pike push-up (Figure 3A-2)
- Setup: Place the hands slightly wider than the shoulders, raise the hips into an inverted V, and allow the heels to rise.
- Action: Lower the head in the direction between the hands while keeping the forearms near vertical, then push the floor away. Keep the trunk controlled without swinging through the lower back.
- Regression and progression: Reduce the range or elevate the hands on a stable low surface. After reaching the repetition ceiling, increase range first. A dumbbell overhead press may replace this movement after purchase, but it is not mixed into the current version.
U3 — One-arm row (Figure 3A-3)
- Setup: Brace the free hand on the thigh or a stable support and hinge with a stable back. Grip both backpack straps near the bag and let the working arm hang.
- Action: Pull the elbow toward the rear pocket, keep the shoulder away from the ear, and prevent the trunk from rotating. The elbow need not travel far beyond the body.
- Backpack safety: Close the zip, secure the contents, and do not rely on one top handle. If the forearm fails first, reduce load and slow the movement instead of jerking.
- Progression: Add small amounts to the backpack after reaching the repetition ceiling; the same movement transfers directly to a dumbbell. A fixed low-bar row or pull-up is a later independent replacement and does not appear in the current table.
U4 — Band pulldown (Figure 3A-4; after buying E1)
- Setup: Secure an intact band to a reliable high point according to the manufacturer’s compatible anchor, door, and loading direction. Test it under low tension. Do not perform this movement yet.
- Action: Sit or kneel without excessive rib flare and draw the elbows down beside the ribs. Do not pull the band behind the neck.
- Pass standard: The trunk does not lean back for momentum, both arms move together, and the return is controlled. Inspect the band and anchor before every set and keep face and body outside the recoil path.
- How it enters later: After buying E1, replace one U3 exposure on day B or C with U4 rather than adding a full extra back session. Pull-ups become another replacement only after fixed E3 access is verified.
Figure 3B | Upper-body movements 5–8 Select any card to jump to its identically named instruction.
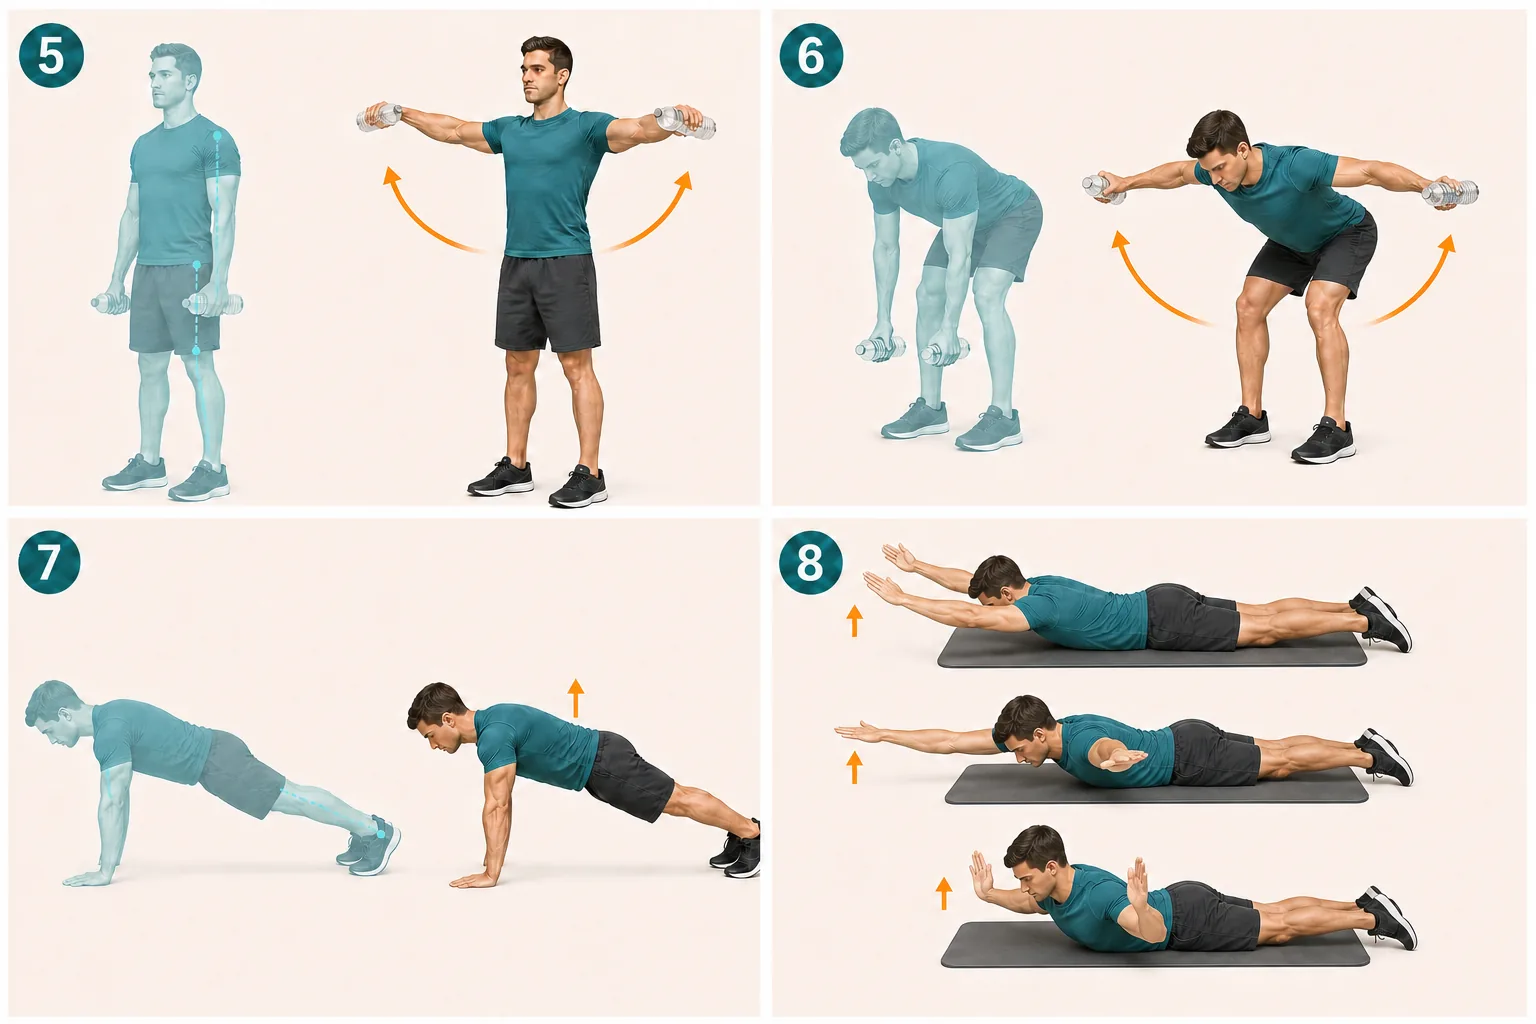
In Figure 3B-7 the elbows remain straight while the upper back moves slightly farther from the floor. The Figure 3B-8 card shows the separate Y, T, and W positions from top to bottom.
U5 — Lateral raise (Figure 3B-5)
- Action: Place the arms about 20–30 degrees forward of the body’s exact side, soften the elbows, and lead them outward to roughly shoulder height. Use two sealed bottles of equal capacity.
- Pass standard: Do not shrug or swing the body. Add clean repetitions and a short top pause before adding a small amount of load; reduce load and height if the neck fails first.
U6 — Bent-over reverse fly (Figure 3B-6)
- Action: Hold the L3 hip hinge with a stable back and sweep both arms outward in a wide arc, thinking of the upper arms moving apart.
- Pass standard: The bottles are much lighter than the U3 row load, the trunk does not rotate, and the lower back does not spring upward. Add clean repetitions and a top pause before load.
U7 — Push-up plus (Figure 3B-7)
- Action: At the straight-arm top of a push-up, continue pushing the ground away so the scapulae travel around the ribcage. Return only to neutral without collapsing the chest.
- Pass standard: The scapulae move over the ribcage without shrugging or bending the elbows. Use a wall or stable incline if the floor is too difficult.
U8 — Prone Y–T–W (Figure 3B-8)
- Action: Lie face down with the chin gently tucked and move the arms through Y, T, and W shapes. Lift each a short distance and pause for one second.
- Pass standard: Count each letter separately and keep the range small enough that the lower back does not lift the chest. This is scapular-control work and does not replace U3 rows or U4 pulldowns.
Movement instruction: trunk, adductors, carries, and forearms
Figure 4A | Trunk and forearm movements 1–4 Select any card to jump to its identically named instruction.
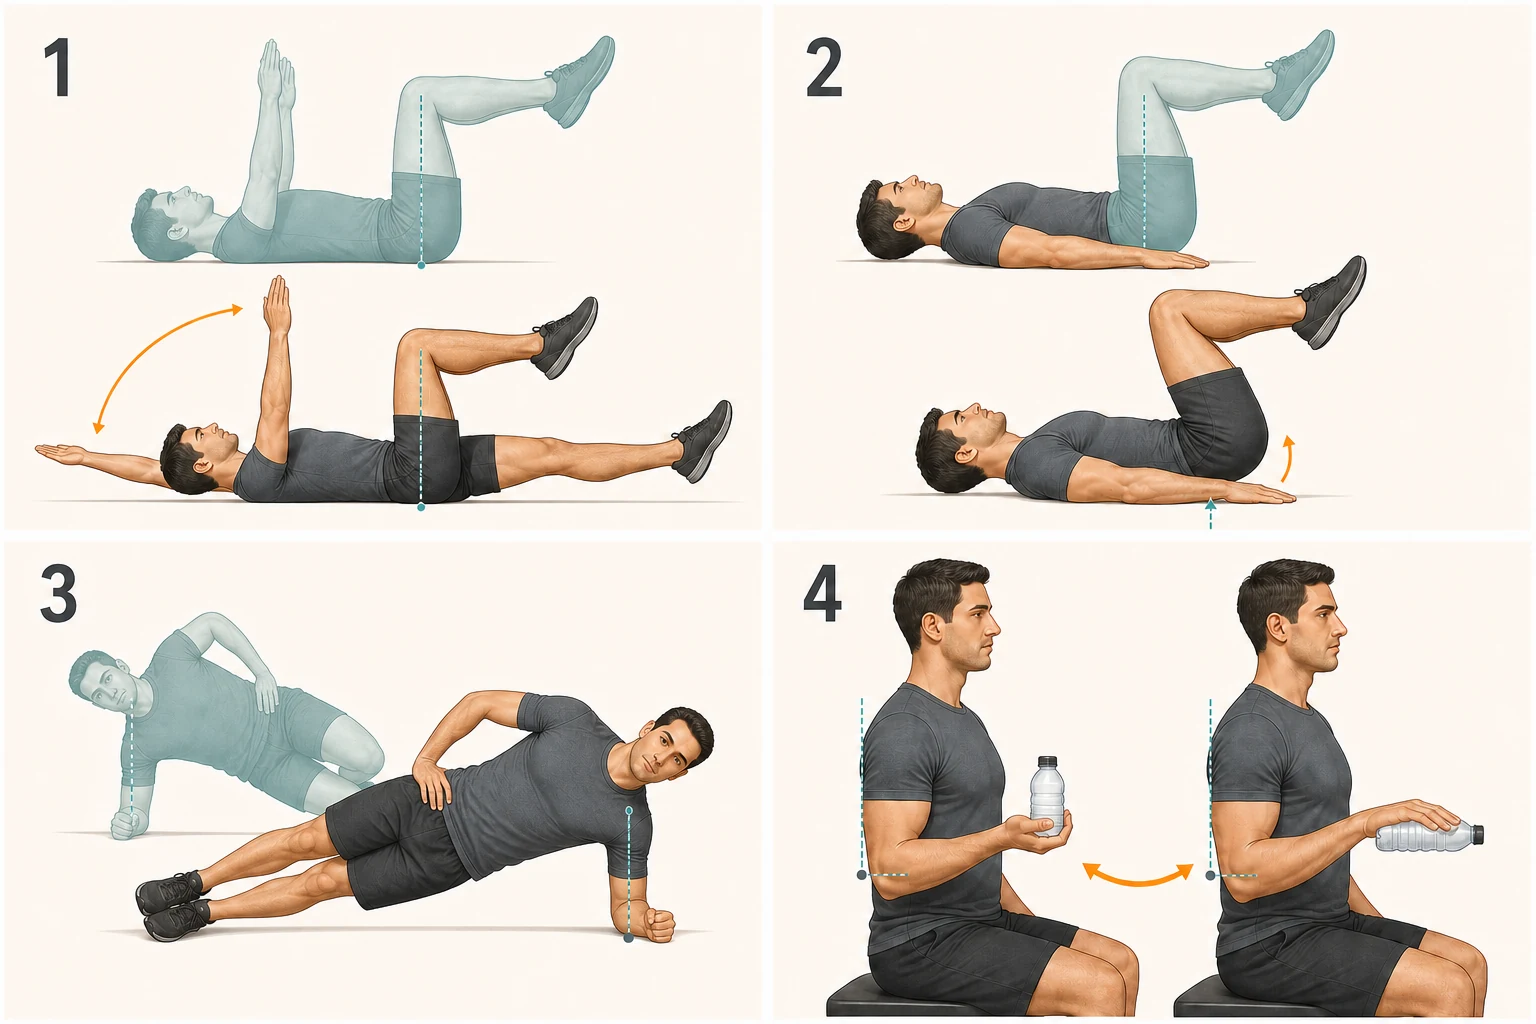
In Figure 4A-3, teal is the bent-knee regression and charcoal the straight-leg version. The illustrated ranges show direction and are not mandatory maxima.
C1 — Dead bug (Figure 4A-1)
- Setup: Lie on the back with hips and knees near 90 degrees and arms pointing at the ceiling. Exhale slowly, let the ribs settle, and place comfortable pressure from the lower back into the floor.
- Action: Move the opposite arm and leg slowly away, stopping before the lower back loses its position. Return and change sides. Take a new breath for each repetition rather than holding it for a long time.
- Pass standard: The abdomen remains active, the pelvis does not rock, and the back does not visibly arch as the leg reaches. Regress by moving only one leg or tapping the heel down.
C2 — Reverse crunch (Figure 4A-2)
- Setup: Lie on the back and press the hands lightly into the floor or hold a stable fixed point that cannot move. Bend hips and knees to roughly 90 degrees. Exhale to settle the ribs and place the lower back comfortably near the floor.
- Action: Use the abdomen to curl the pelvis toward the ribs until the tailbone leaves the floor by a small distance. The knees merely follow the pelvis; do not swing the legs to move the body. Lower slowly and begin the next repetition only after the pelvis returns.
- Pass standard: The range may be small, the rectus abdominis visibly shortens, and the neck and hip flexors do not become excessively tense. Add pauses and repetitions first; consider a very light ankle load only after 15 continuously controlled repetitions.
- Regression and stop rule: Reduce the curl or touch the heels down to reset each repetition. Stop for sharp lower-back pain and do not replace control with faster leg swinging.
C3 — Side plank (Figure 4A-3)
- Setup: Place the elbow under the shoulder. Begin with the teal bent-knee version, supporting the body on the knees and forearm.
- Action: Raise the hips until ear, shoulder, and hip are close to one line, with the chest facing forward. Do not sink into the neck or roll the body forward.
- Progression and stop rule: Add time, then straighten the legs. After a stable 40 seconds, C6 suitcase carries may replace this movement; the two do not both need added volume.
F2 — Forearm pronation-supination (Figure 4A-4)
- Action: Bend the elbow to 90 degrees beside the body, hold the middle of a water bottle, and turn the palm slowly upward and then downward through a painless range.
- Pass standard: The elbow remains at the body and the forearm rotates without the shoulder swinging. Holding the bottle at one end greatly increases leverage and comes only after the middle grip is very easy.
Figure 4B | Trunk, adductor, carry, and forearm movements 5–8 Select any card to jump to its identically named instruction.
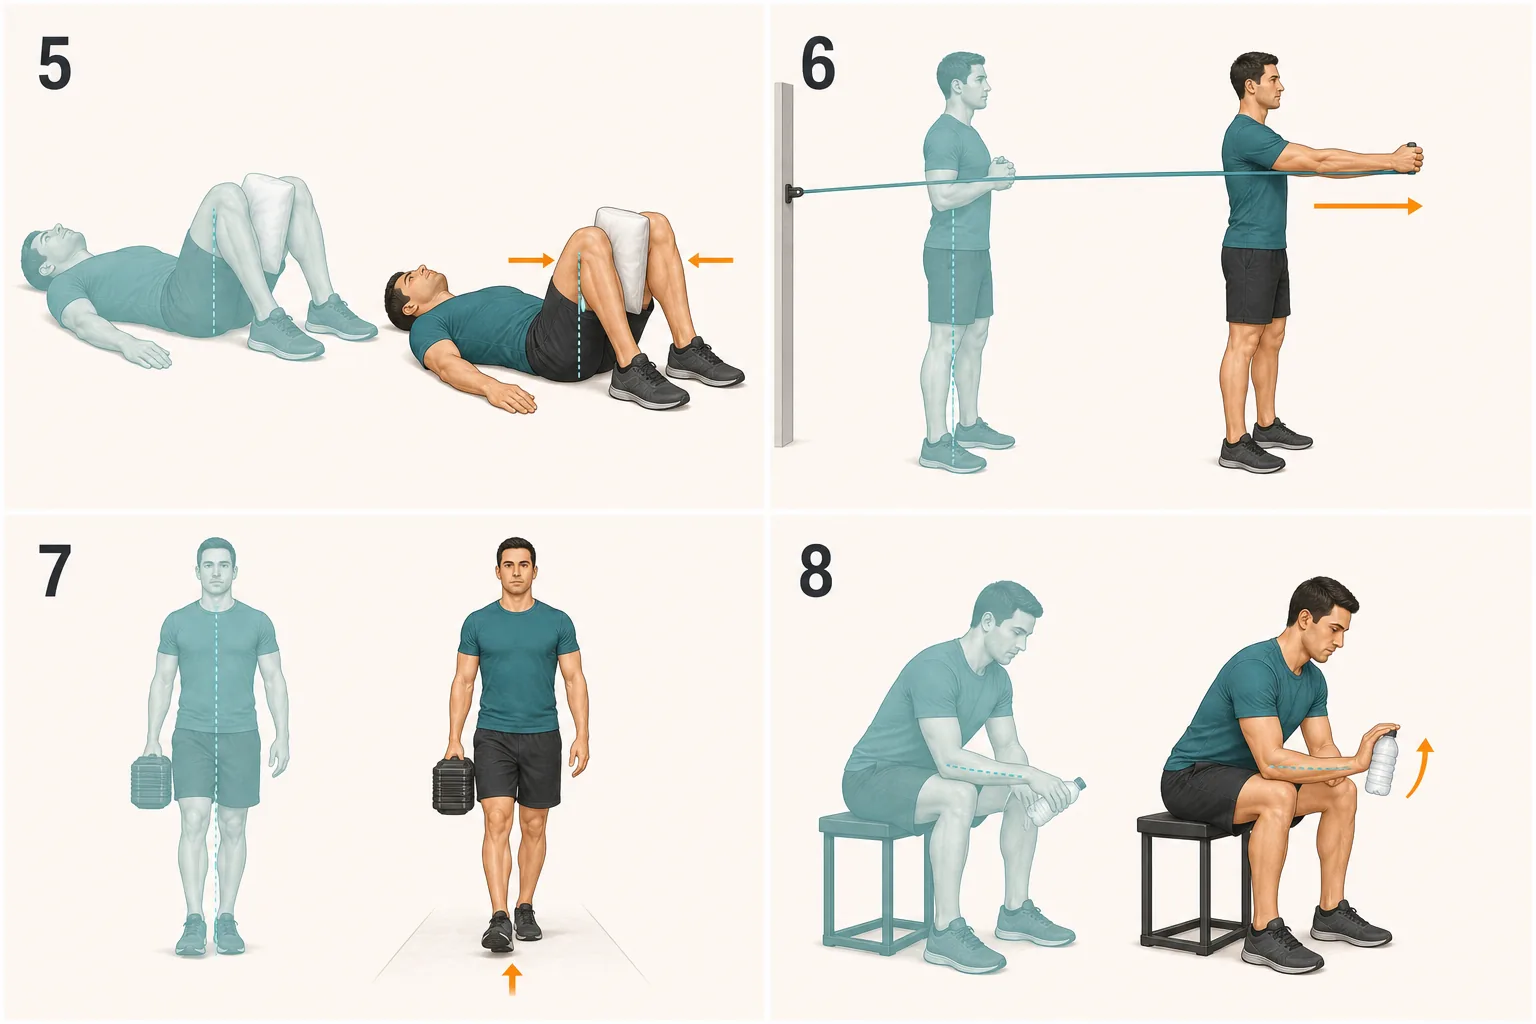
Figures 4B-6 and 4B-7 begin only after E1 and E2 respectively. The cards explain body position but do not replace anchor instructions or product load ratings.
C4 — Pillow adductor squeeze (Figure 4B-5)
- Setup: Lie with bent knees and feet down, placing a resilient pillow that cannot slip between the knees.
- Action: Squeeze inward evenly for 20–30 seconds while breathing normally. Keep the pelvis down and do not push the feet against each other.
- Pass standard: Both inner thighs work similarly without sharp groin pain. Reach 30 seconds before increasing squeeze intensity.
- Later version: Only after buying a stable E4 bench and mastering the side plank may this be replaced by a short-lever Copenhagen side plank. It is not the current movement, and an ordinary chair or sliding sofa edge is unsuitable.
C5 — Pallof press (Figure 4B-6; after buying E1)
- Setup: Anchor the band at chest height, stand side-on, and verify the anchor and recoil path under low tension. Do not perform this movement yet.
- Action: Press both hands slowly away from the chest while resisting rotation toward the anchor, then return. Keep pelvis and sternum facing forward.
- Pass standard: Both sides use the same stance and range, the obliques work, and the neck does not take over. After buying E1, C5 may replace C1 or C3 without simply adding more trunk sets.
C6 — One-arm suitcase carry (Figure 4B-7; after buying E2)
- Setup: Hold one dumbbell, stand tall, let the shoulder settle naturally, and clear a level walking path. Do not perform this movement without a reliable one-hand load.
- Action: Walk slowly with a normal stride while keeping shoulders and pelvis roughly level. Do not lean toward the load or rest it against the leg.
- Progression: Stabilize 30 seconds before adding time or load. After buying E2, C6 may replace C3. Do not improvise with an unrated backpack top handle.
F1 — Wrist extension (Figure 4B-8)
- Action: Support the forearm on the thigh or a table with the palm down and wrist free. Raise the back of the hand slowly with a light bottle and lower fully while keeping the forearm down.
- Pass standard: The wrist and elbow do not sting and the whole arm does not swing. Reduce these sets first when actual HEMA grip time rises.
How singing fits the system
Formal singing and strength training both need regular practice, progressive tasks, feedback, and recovery, but their training targets differ. Strength work can quantify muscular stimulus through load, repetitions, and proximity to failure. Singing depends more on coordination among breathing, vocal-fold vibration, resonance, and auditory feedback. The diaphragm works during inhalation, and the abdominal wall and ribcage muscles help regulate exhalation, but making the abdomen sore or using an inspiratory-resistance device does not automatically improve pitch, tone, or register transitions.
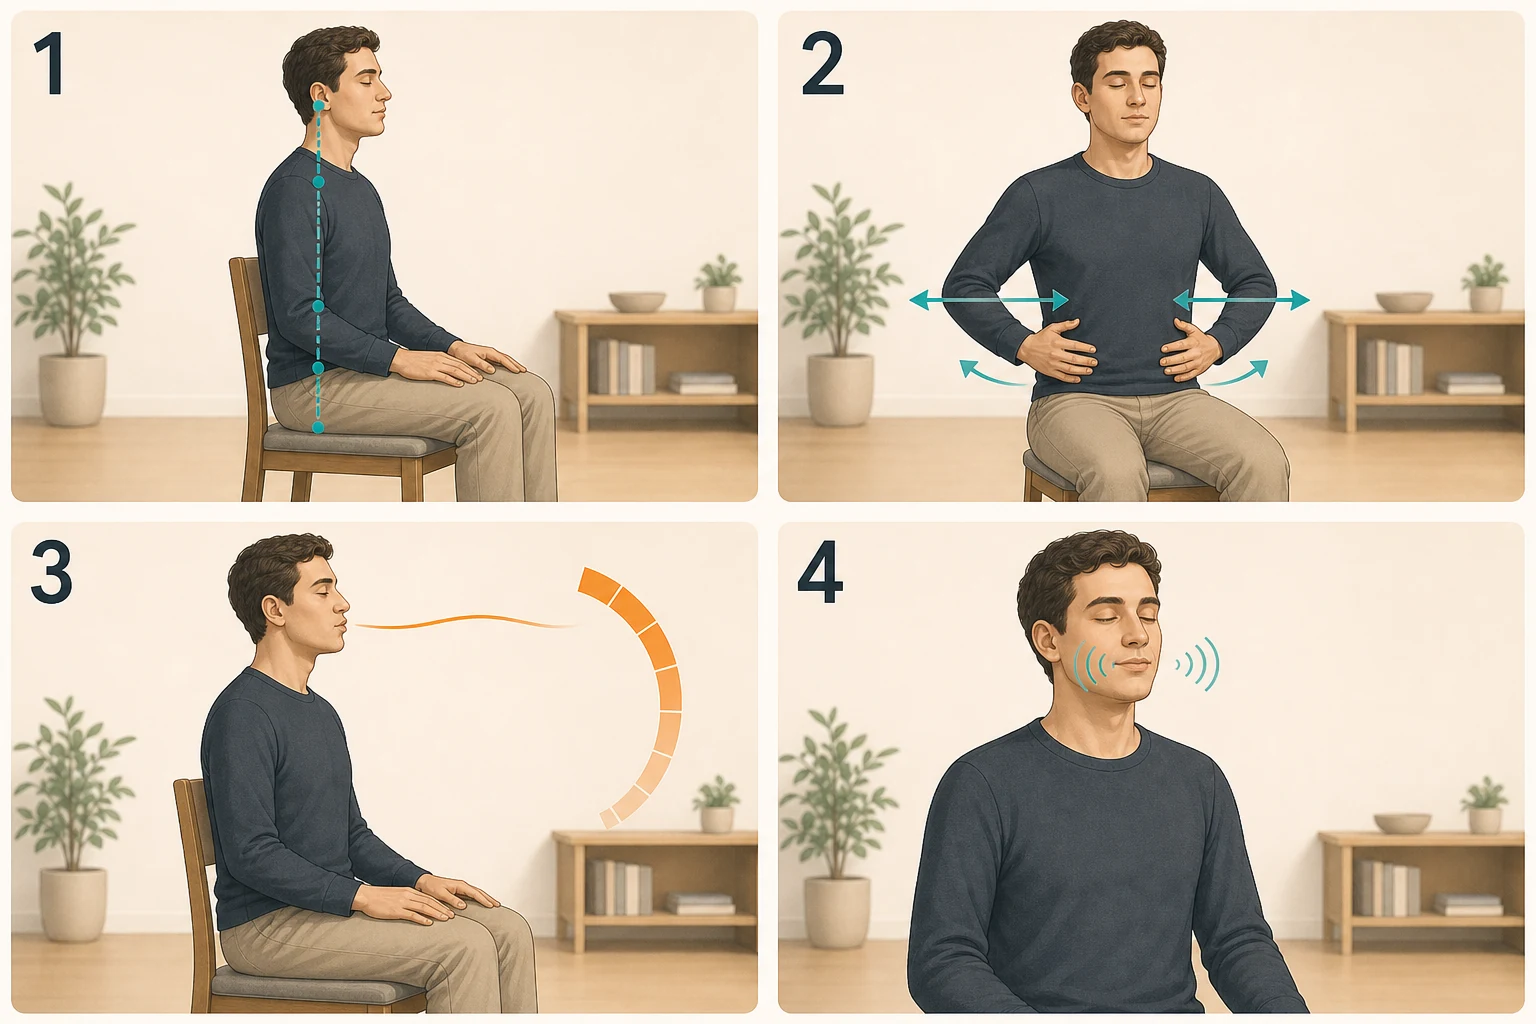
| **Figure mapping: Figure 5-1 = V1 | Relaxed seated posture; Figure 5-2 = V2 | Quiet inhalation; Figure 5-3 = V3 | Gentle even hiss; Figure 5-4 = V4 | Soft humming, lip trill, or straw phonation.** Complete V1–V4 in order for 6–10 minutes on four to six days each week. The arrows show direction and steadiness, not maximal chest or abdominal expansion. |
V1 | Relaxed seated posture (Figure 5-1)
Sit on the front half of a stable chair with both feet down, allowing ears, shoulders, ribs, and pelvis to stack naturally. Do not deliberately brace the jaw, shoulders, or abdomen. Spend about 30 seconds confirming that breathing feels easy.
V2 | Quiet inhalation (Figure 5-2)
Place the hands lightly on the lower ribs and take four quiet inhalations. Notice the ribs expand toward the sides and back while the shoulders and neck remain still. Observe the natural range without inhaling maximally or lifting and holding the chest.
V3 | Gentle even hiss (Figure 5-3)
Perform four gentle, continuous “sss” exhalations of 8–12 seconds. Keep the flow as even as possible from start to finish, seeking steadiness rather than maximum duration. Breathe and rest normally between repetitions.
V4 | Soft humming, lip trill, or straw phonation (Figure 5-4)
Practise for 3–5 minutes in a comfortable middle range. Choose only one of humming, lip trills, or straw phonation for this unit; all three need not be completed. Keep volume no harder than easy speech, then begin song practice. When singing and strength work share a day, sing first or separate them by several hours.
Stop singing if the voice is hoarse or painful, high notes disappear suddenly, or speaking becomes effortful. Persistent or recurring symptoms need assessment by an ear, nose, and throat physician and, when appropriate, a voice-specialist speech-language pathologist. A training plan cannot diagnose vocal-fold problems. Buy a respiratory muscle trainer only when a singing teacher or clinical professional has identified a specific problem, target, and dose.
Equipment purchase order
A logged bottleneck triggers a purchase: a movement reaches its repetition ceiling in two consecutive sessions and further repetitions have become inefficient; improvised loading is becoming unsafe; or the back lacks a reliable vertical pull. Continue with the current version if none of these occurs.
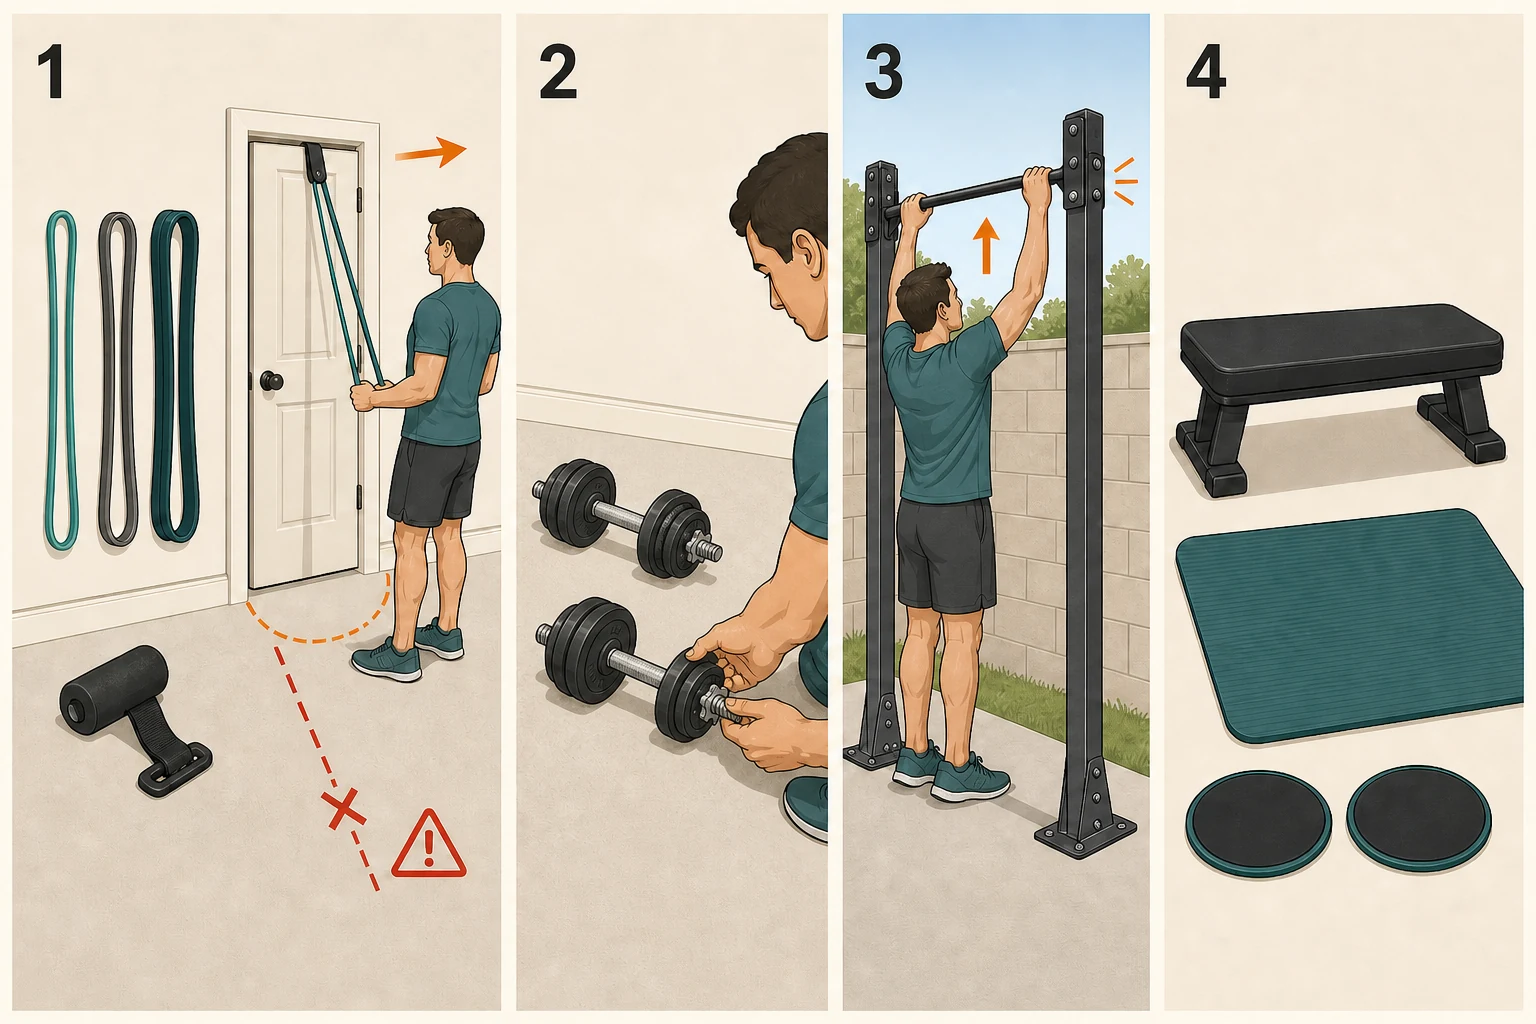
| **Figure mapping: Figure 6-1 = E1 | Long loop bands and compatible anchor; Figure 6-2 = E2 | Matched adjustable dumbbells; Figure 6-3 = E3 | Fixed pull-up access; Figure 6-4 = E4 | Stable bench or low step, mat, and sliders.** The codes are also the purchase order. The figure shows categories and first checks, not brands, exact dimensions, load certification, or installation instructions. |
| Figure and unique name | Purchase check | What it replaces after purchase |
|---|---|---|
| E1 — Long loop bands and compatible anchor (Figure 6-1) | Choose clearly distinct light, medium, and heavy resistance plus one very light band. The manufacturer should specify material, dimensions, compatible anchoring, and loading direction. Inspect for cracks and keep face and body outside the recoil path | Replace one U3 exposure on day B or C with U4 — Band pulldown; C5 — Pallof press may replace C1 or C3 |
| E2 — Matched adjustable dumbbells (Figure 6-2) | Both locks can be visually checked before every set; increments are no larger than roughly 2 kg per dumbbell; handles are comfortable and bases stable. Roughly 24 kg maximum per dumbbell is a practical one-time-purchase starting point | Convert backpack U3 and L3 directly to dumbbells; convert bottle U5, U6, F1, and F2 to light dumbbells; C3 may be replaced by C6 — One-arm suitcase carry |
| E3 — Fixed pull-up access (Figure 6-3) | Prefer a fixed park bar. Home wall or ceiling mounting requires confirmed structure and correct installation. Door-frame equipment needs a stated rating and frame compatibility; avoid untraceable friction-only telescoping bars | Pull-ups may replace one U3 or U4 exposure. Begin with foot assistance and a controlled descent instead of adding a full extra pulling programme |
| E4 — Stable bench or low step, mat, and sliders (Figure 6-4) | A bench or step needs a stated rating, four non-slip contacts, and no wobble. Buy sliders and a mat only for a real floor requirement | L5 can use a progressively higher step; L6 may become a sliding leg curl; after mastery, C4 may become a short-lever Copenhagen side plank |
Do not begin with a neck harness, respiratory muscle trainer, unstable balance board, boxing-branded “specific” gadget, or large multi-gym. Their evidence may not match the goal, or their value cannot yet be judged without a stable training record. Never drop adjustable dumbbells, retire cracked bands, and install and inspect all fixed equipment according to its manufacturer.
How to adjust when hobbies return
Strength training prepares muscles and basic physical capacity. It does not replace feedback in singing, strikes and defence in boxing, distance and timing in HEMA, or skiing technique. Once classes begin, skill quality takes priority over preserving every gym set.
| Actual weekly hobby load | Strength adjustment | Additional rule |
|---|---|---|
| 0 sessions, the current state | Complete A, B, and C | Use the twelve weeks to establish a baseline; do not add imagined “sport-specific conditioning” |
| 1 boxing, HEMA, or skiing session | Keep three days if recovery remains normal; remove jumps from the nearest strength day and place the hard leg session about 48 hours earlier | At the first repeated drop in sport performance, remove 1 set each from lower-body and forearm work that week instead of masking fatigue with caffeine |
| 2–3 total boxing, HEMA, or skiing sessions | Move to two full-body sessions per week and rotate A, B, and C; use 2–3 sets per movement | Retain one hinge, one single-leg squat, two pushes, and two pulls; remove 1 set from each accessory |
| Consecutive ski days or the week before an important event | Retain the movements but halve lower-body work sets and remove jumps 3–5 days before departure | Arrive with familiar movements and low soreness; do not test limits in the final week |
| Singing is the only addition | The strength schedule need not automatically shrink | Put formal singing before strength work or separate it; treat voice fatigue as a voice issue rather than compensating with more abdominal work |
If neck work is genuinely wanted, use only gentle palm-resisted isometrics in the front, back, left, and right directions: 2 sets of 10–20 seconds per direction at roughly thirty to fifty percent perceived effort. Keep the head and neck neutral, avoid fast neck circles, and do not treat this as concussion protection. A history of neck pain, arm numbness, dizziness, or concussion warrants professional assessment first.
Rules for growth, deloading, and maintenance
Record effort using repetitions in reserve (RIR). RIR 2 means roughly two more repetitions could have been performed with the current form. Most building-phase work sets stop at RIR 1–3; routine technical failure is unnecessary. Power work ends before speed falls, and small stabilizer exercises end before compensation appears.
Make only one weekly adjustment:
- When the same movement reaches the top of its repetition range in two consecutive sessions with RIR 2 still available, add the smallest load or enter one harder version.
- When a tier-one muscle shows no change in performance, circumference, or photographs for three consecutive weeks while sleep, protein, and completion are adequate, first add 1–2 weekly hard sets for that muscle.
- When the same movement declines twice, soreness still disrupts daily life after 72 hours, or hobby quality falls, halve the relevant muscle’s work sets in the next week. Do not reinterpret pain as an ordinary deload issue.
- When a session exceeds 70 minutes, remove conditional-tier and accessory work first. Do not compress rest on large movements or turn the whole session into a no-rest circuit.
At 65 kg, roughly 100–115 g of protein per day is an executable range, spread across three or four meals. Protein powder is unnecessary when food covers it. Spend the first two weeks around estimated maintenance calories while logging a seven-day moving average of morning weight. If training and recovery are normal but weight, circumferences, and main movements all remain unchanged for three weeks, add roughly 100–200 kcal per day. The average need rise only about 0–0.15 kg per week. If waist size rises clearly faster than strength and target muscles, remove those calories first. Sustained large energy deficits impair lean-mass gain and should not accompany a maximal hypertrophy phase.
For maintenance, keep similar movement difficulty and effort while first reducing each muscle’s building volume to roughly one-third to one-half, distributed across one or two weekly exposures. Retain that dose when performance and circumference remain stable for four weeks; restore one or two sets when they fall. The maintenance dose is an individual test result, not something determined by a claim that a muscle disappears after a few days.
Sources and limits of the evidence
This schedule is a personal starting plan inferred from muscle demands shared across several goals. Research has not directly compared this complete A, B, and C combination. The sources below separately support training volume, maintenance, singing boundaries, and hobby-related muscular demands. They do not prove that one exercise order is uniquely correct.
| Judgment | Source | How it is used here |
|---|---|---|
| Simple, regular resistance training works; major muscle groups should be covered at least twice weekly, roughly 10 sets per muscle per week is a common hypertrophy reference, bodyweight and bands are effective, and failure or complex periodization is not universally required | ACSM explanation of its 2026 resistance-training guideline | Establishes the three-day full-body structure, 8–12-set range, and RIR 1–3 |
| Established adaptations can be retained with markedly lower training doses, although the minimum varies with age, load, and outcome | Bickel et al. on retaining adaptations after training-dose reduction | Sets one-third to one-half of building volume as a maintenance starting test rather than a guarantee |
| Training to momentary failure and retaining repetitions can produce similar hypertrophy | Comparison of repetitions-in-reserve and failure training | Avoids routine failure and prioritizes technique and recovery |
| Protein benefits for resistance trainees tend to plateau near 1.6 g/kg/day, with individual uncertainty | Systematic review of protein supplementation, muscle mass, and strength | Produces the practical range of about 100–115 g/day at 65 kg |
| Sustained energy deficiency impairs resistance-training gains in lean mass | Meta-analysis of energy deficiency and resistance-training adaptation | Separates aggressive weight loss from the maximal-growth phase |
| Classical singers adapt thoracoabdominal breathing patterns to phrases; added respiratory-muscle strength work improves some respiratory measures, but voice outcomes are inconsistent | Study of breathing patterns in singing; study of respiratory muscle strength training in classical singers | Treats singing as coordination and does not default to a respiratory trainer |
| Voice fatigue, hoarseness, pain, and effortful speech require reduced use and medical attention when persistent | Voice-care guidance from the US National Institute on Deafness and Other Communication Disorders | Defines stop and referral boundaries for voice practice |
| Teaching plates can expose start, finish, and alignment cues for the reader to check, but one illustration cannot replace movement-by-movement instruction; landing in particular requires control of knee valgus and lower-limb alignment | ACE Exercise Library; NSCA Basics of Strength and Conditioning Manual | Calibrates joint direction, range, and language-neutral numbering in the eight teaching-card groups while leaving the prose as the final execution boundary |
| Lower-body fatigue can reduce punch force in trained boxers; strength training relates to fencing movement performance; prolonged recreational skiing reduces eccentric quadriceps and hamstring strength | Boxing lower-body fatigue study; fencing strength-training study; post-skiing eccentric-strength study | Jointly prioritizes hips and legs, single-leg control, posterior chain, and landing-deceleration capacity while avoiding pre-hobby fatigue |
| Existing evidence relating neck strength to concussion risk remains inconsistent | Systematic review of neck strength and concussion risk | Keeps neck work optional and low dose without an injury-prevention promise |
What deserves to remain after twelve weeks is not an immutable spreadsheet, but four rules: let completion rate decide whether the plan is realistic, let clean performance decide progression, let observed bottlenecks decide purchases, and let hobby quality decide when to reduce volume. That is how appearance, maintenance, and utility become one system that can keep running.
Comments
Comments are public and stored in GitHub Discussions. This page connects to giscus.app and GitHub and sends the current page path only after you show comments manually or enable automatic loading. The first load is about 0.13 MB; actual usage varies with comment content. Do not include private information.